NOTES
Self-billed e-invoice refers to Purchases. You may issue a self-billed e-invoice if you are sure that the supplier that provides the product or service to you will not issue an e-invoice for you. For example, a foreign supplier that do not comply to Malaysia's e-invoice regulations.
Prerequisites
- Turn on E-invoice function in individual business's settings. (Tutorial link)
- Prepare necessary taxes. (Tutorial link)
- Prepare necessary invoice templates. (Tutorial link)
Step by step tutorial to create a self-billed e-Invoice
1. After you logged in to your account in Accent system, proceed to Purchases > Purchase History at the side menu.
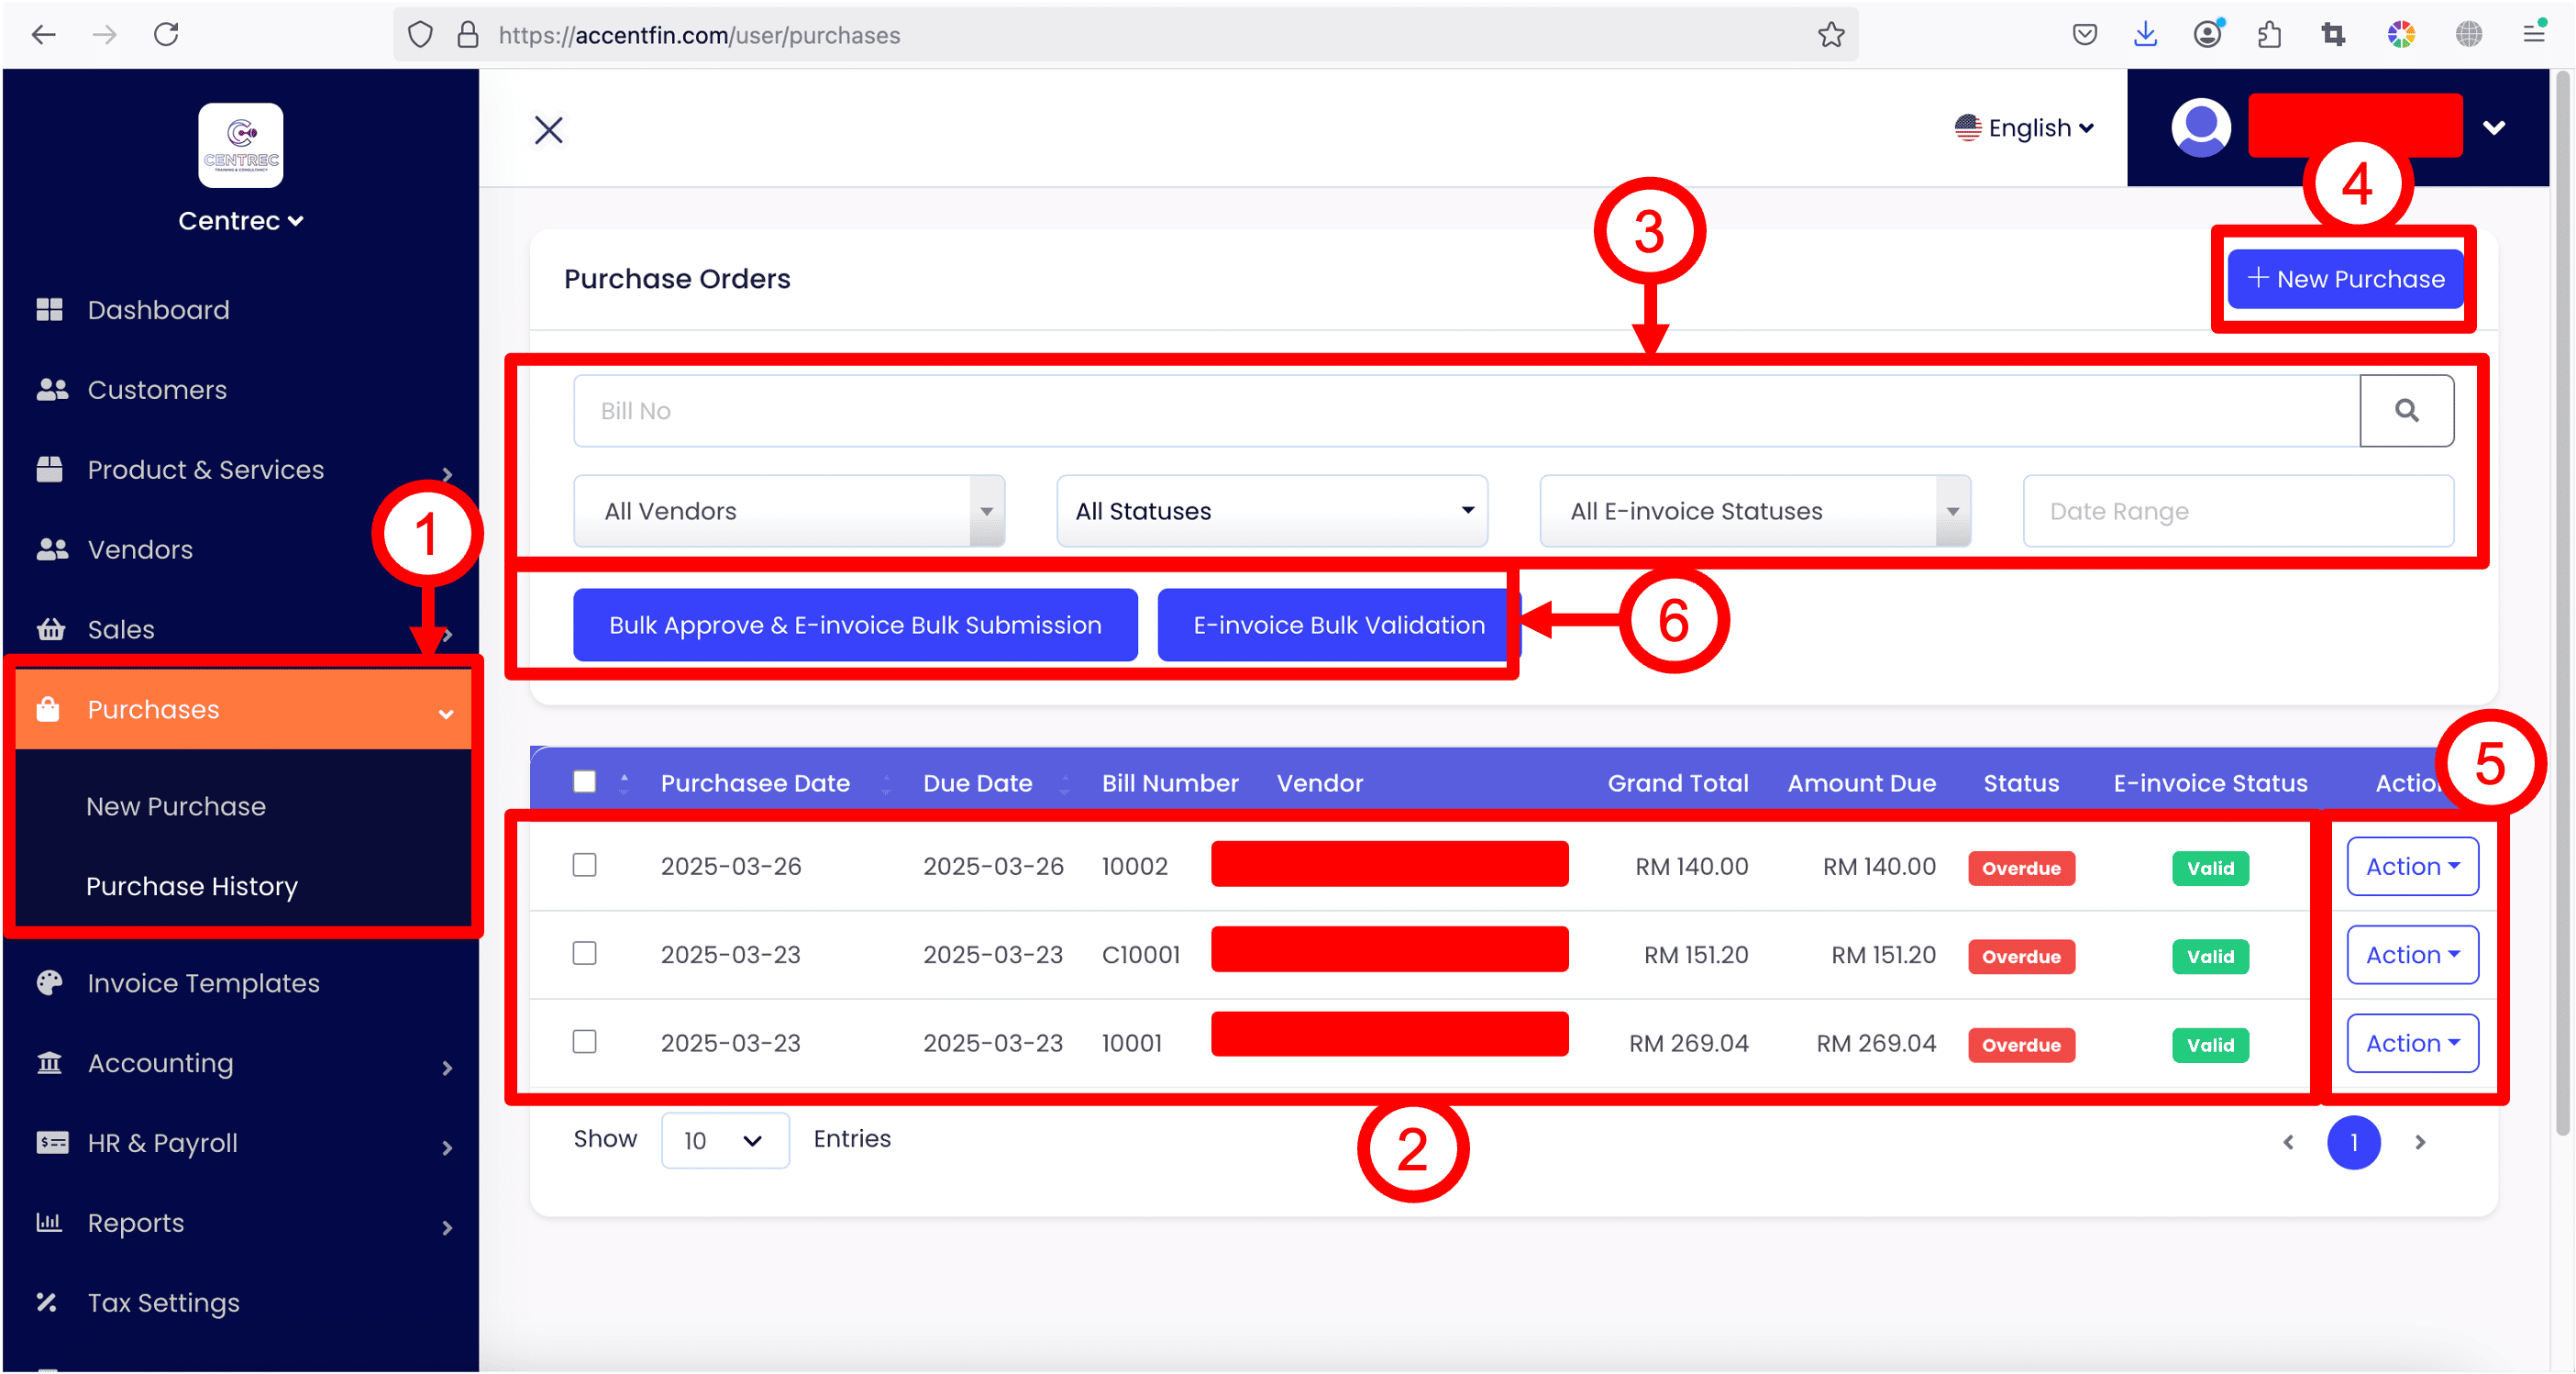
2. Here lists all the purchases that you have created previously.
3. Use the filters to filter your purchases list.
4. Click on + New Purchase to create new purchase.
5. If wish to edit existing purchase, click on the Action button at the right side of the purchase record, then click Edit.
6. If you have a list of purchases (self-billed e-invoices) you wish to approve and submit to MyInvois Portal, you can select the purchases records by checking the check boxes, and click on Bulk Approve & E-invoice Bulk Submission button. After that, you can click on E-invoice Bulk Validation to validate the selected purchases records with MyInvois Portal to make sure the self-billed e-invoices you issued are valid and accepted by MyInvois Portal. Note that these two buttons will only appear if you have enabled E-invoice function of your business (Refer tutorial for more information on how to enable E-invoice function).
7. If you create or edit a purchase, you will be redirected to the purchase editing page (as shown in screenshot below).

8. Fill in all the necessary details.
a. Bill No - compulsory, a unique number to keep track your purchase
b. PO / SO Number - optional
c. Purchase Date and Due Date
d. Vendor - Vendor selection is compulsory
e. Add Purchase Item
f. Purchase Item selected will appear in this table
g. Totals of Purchase
h. Purchase notes and footer - optional
i. Apply discount to purchase - can be percentage or fix number
j. Invoice Template - Refer to this tutorial for more information on what is invoice template

9. Under Vendor selection, you can select a vendor from a list of vendors created under your business. If the vendor you wish to select is not created previously, you can click on Add New button to add a new vendor on the spot.
SPECIAL NOTES

If you select to issue a self-billed consolidated invoice under Invoice Template dropdown (Refer to this tutorial for more information on what is invoice template), then vendor selection will be removed and will not be compulsory as Accent system will automatically issue this document using supplier / vendor general TIN (as requested by MyInvois Portal for consolidated invoice case). Furthermore, the Classification Code dropdown(s) for purchase items will automatically switched to Consolidated e-Invoice and other options will be hidden as this is the requirement by MyInvois Portal for items in consolidated invoice.
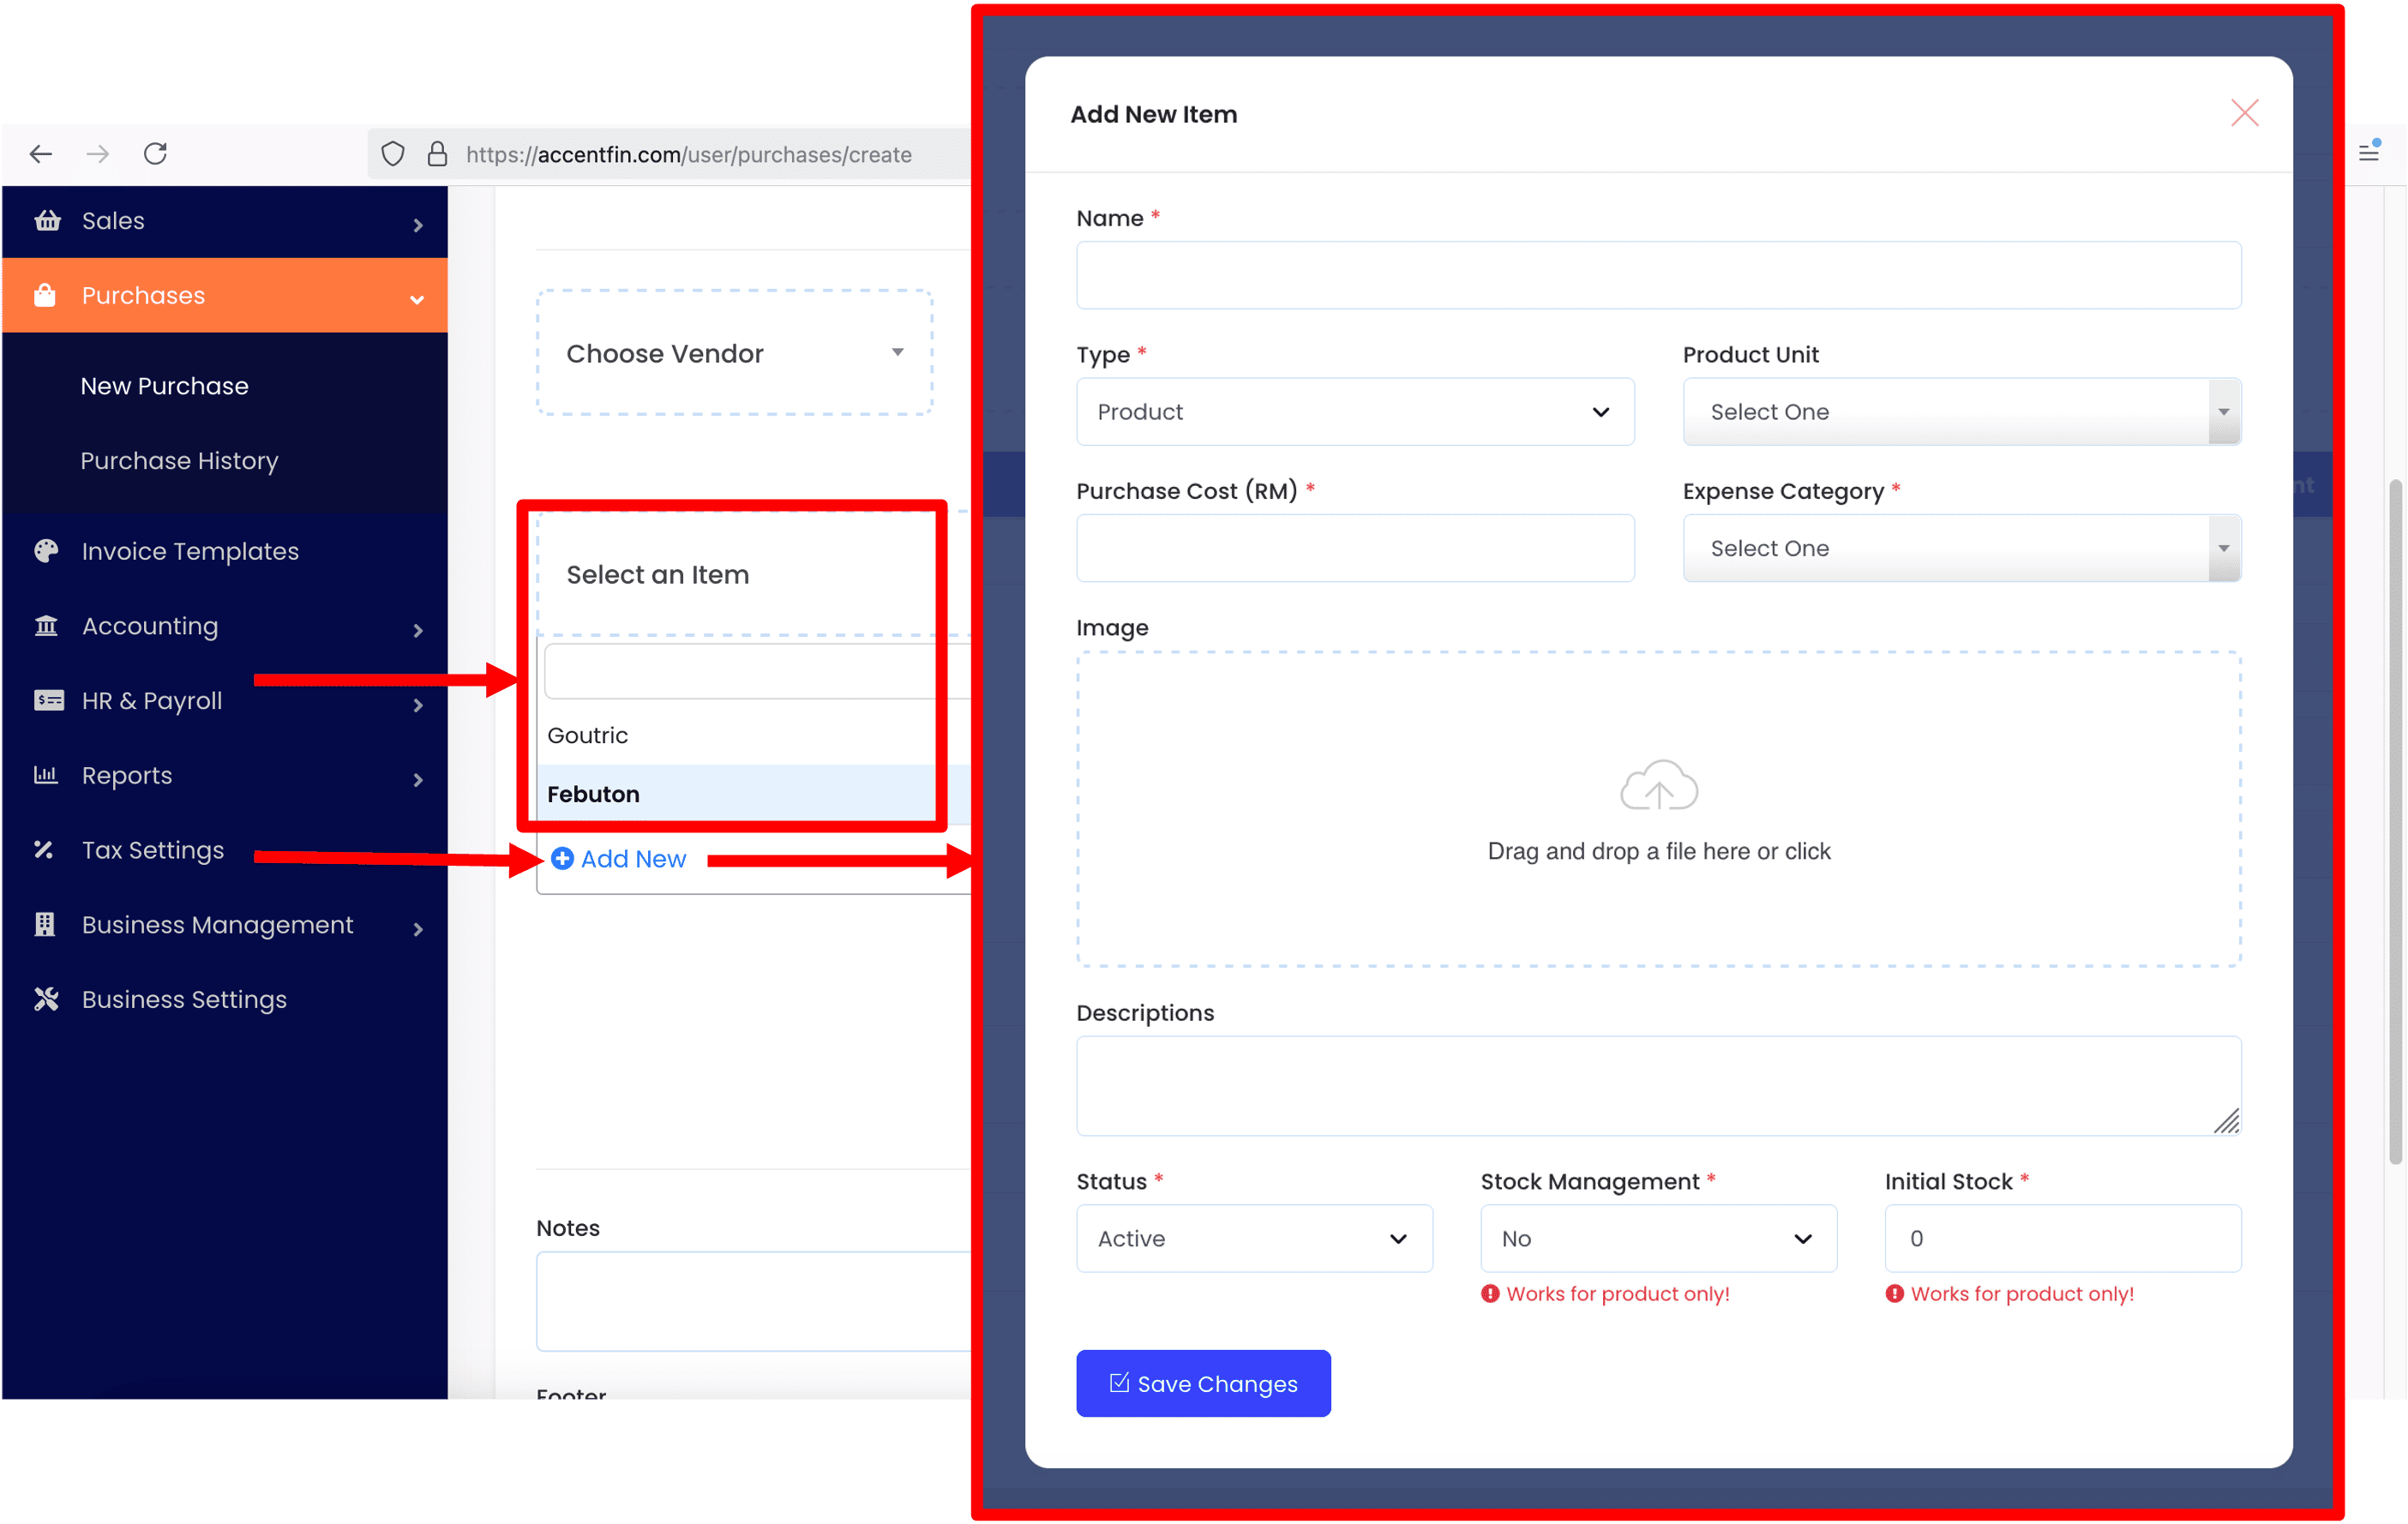
10. Under the dropdown Select an item, you can select a product or service to add to the purchase as a purchase item, these products or services records can be created beforehand at Product & Services section located at the side menu. If a new product or service record is required, you can click on Add New button to add a new product or service on the spot.
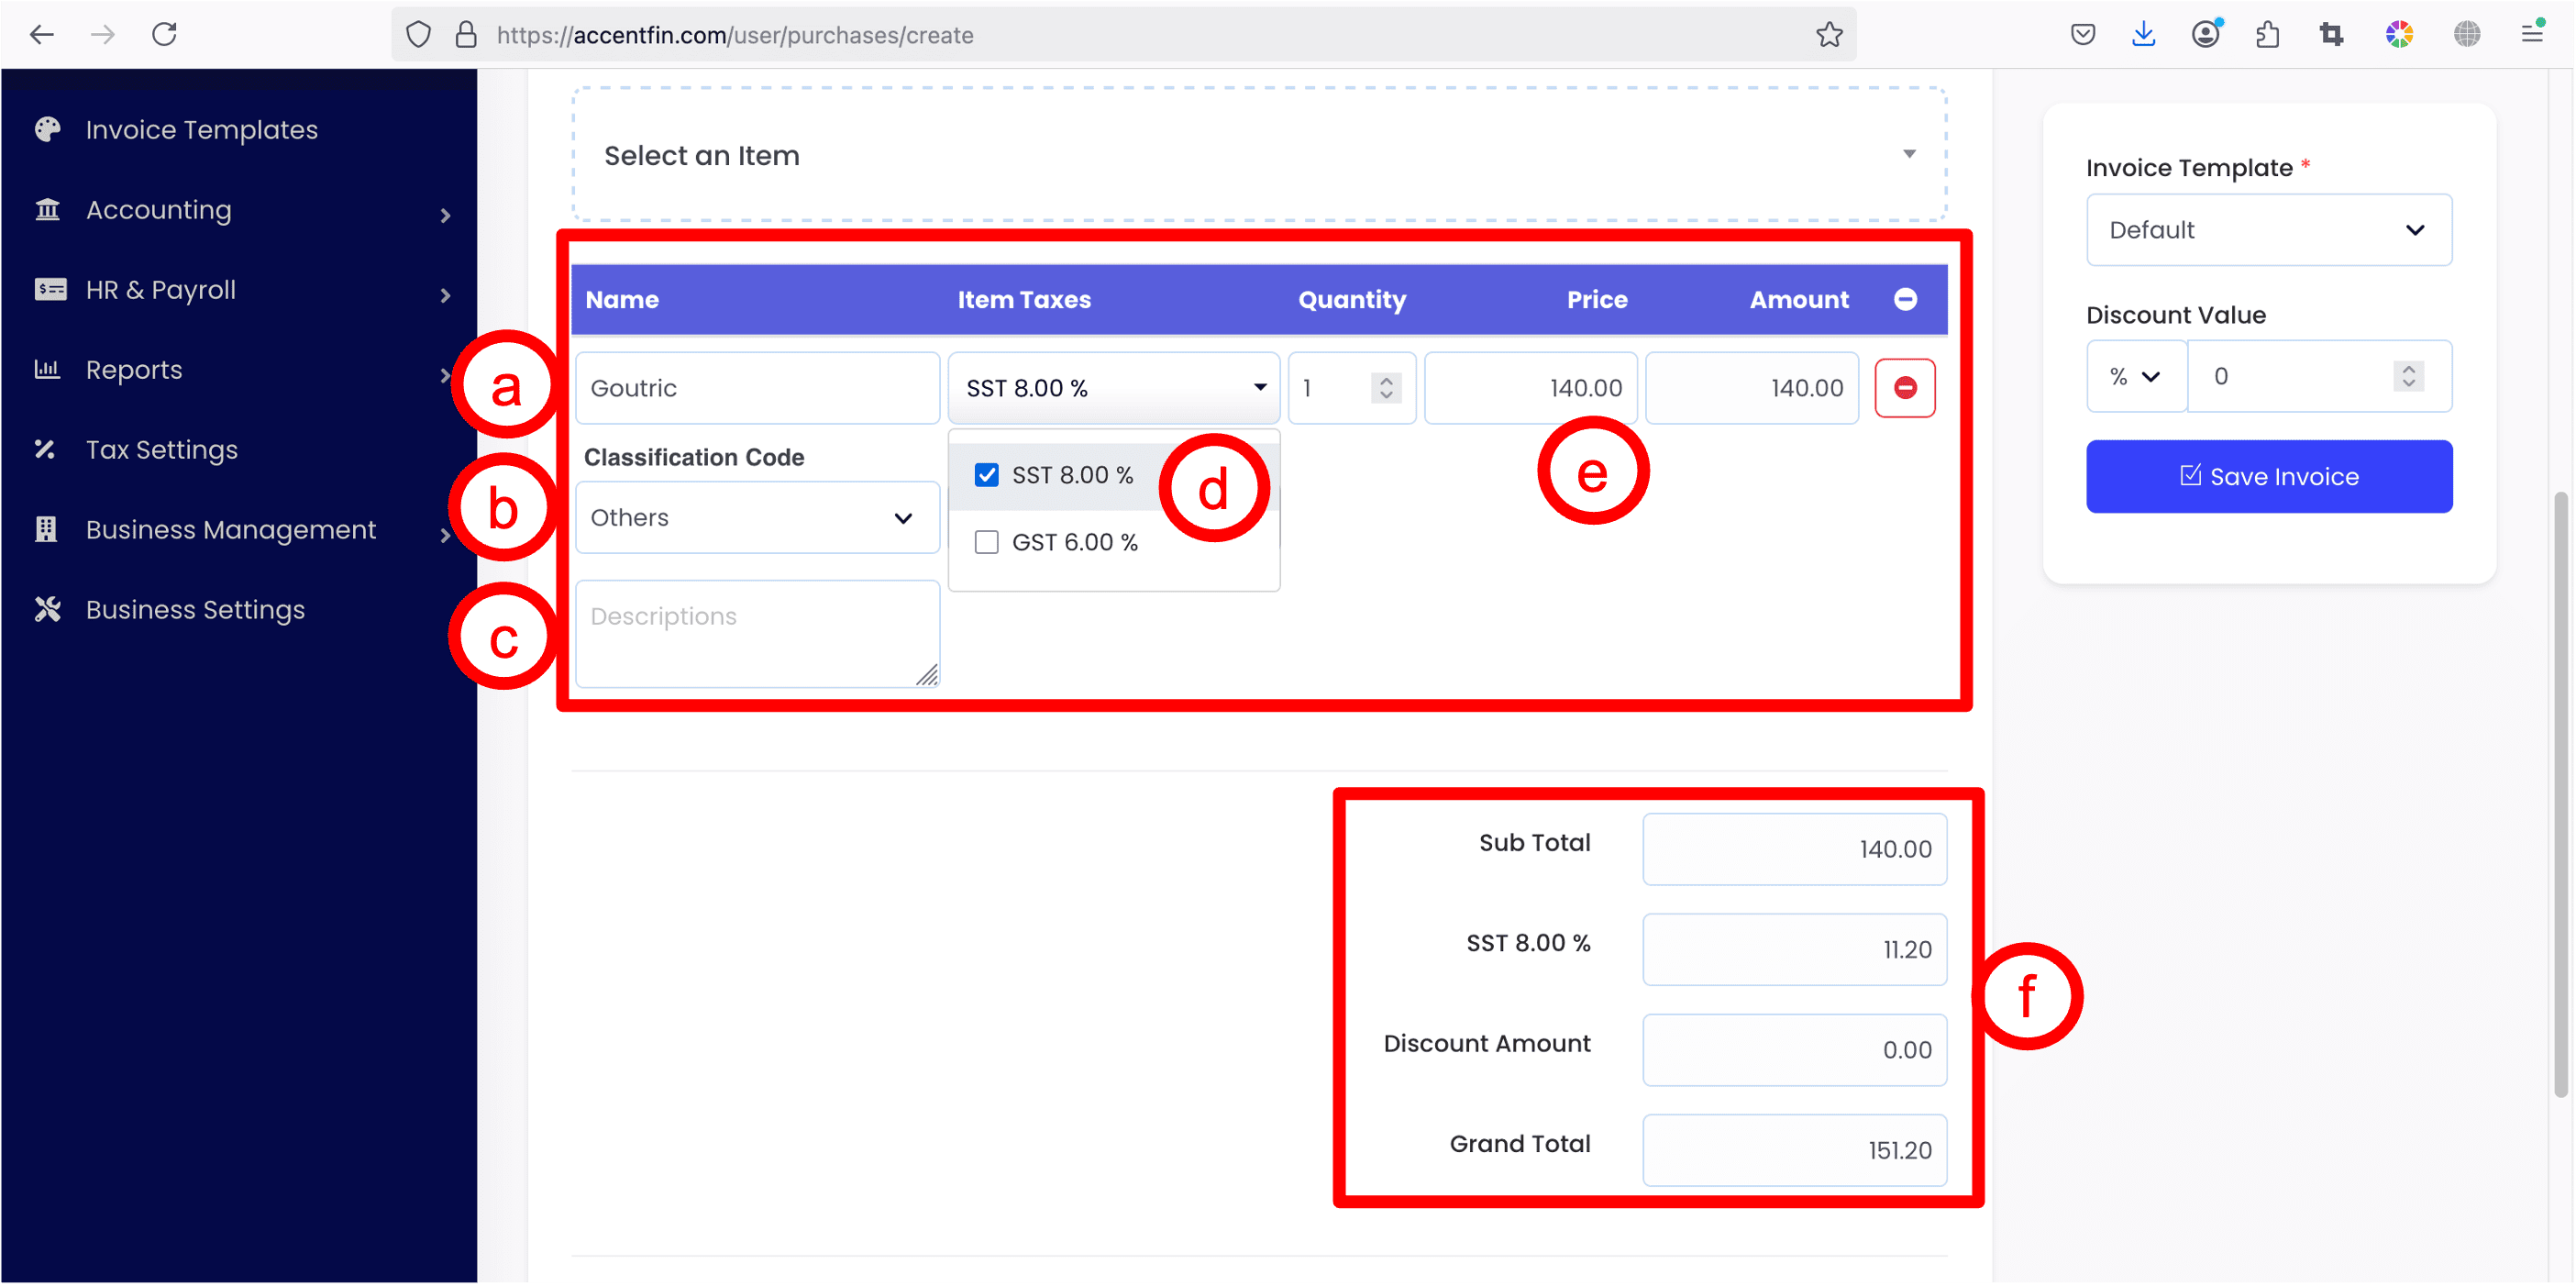
11. Once a purchase item is added, the record will appear inside the purchase items table.
a) shows the purchase item name where you can freely rename it.
b) select a suitable classification code for your purchase item. (this is very important to issue a self-billed e-invoice)
c) write a description for the purchase item if necessary.
d) select one or more taxes to apply the taxes onto the purchase item (refer to this tutorial for more information on taxes settings)
e) edit and update the item quantity, prices if necessary.
f) when purchase items being updated, the purchase totals will be updated automatically too.
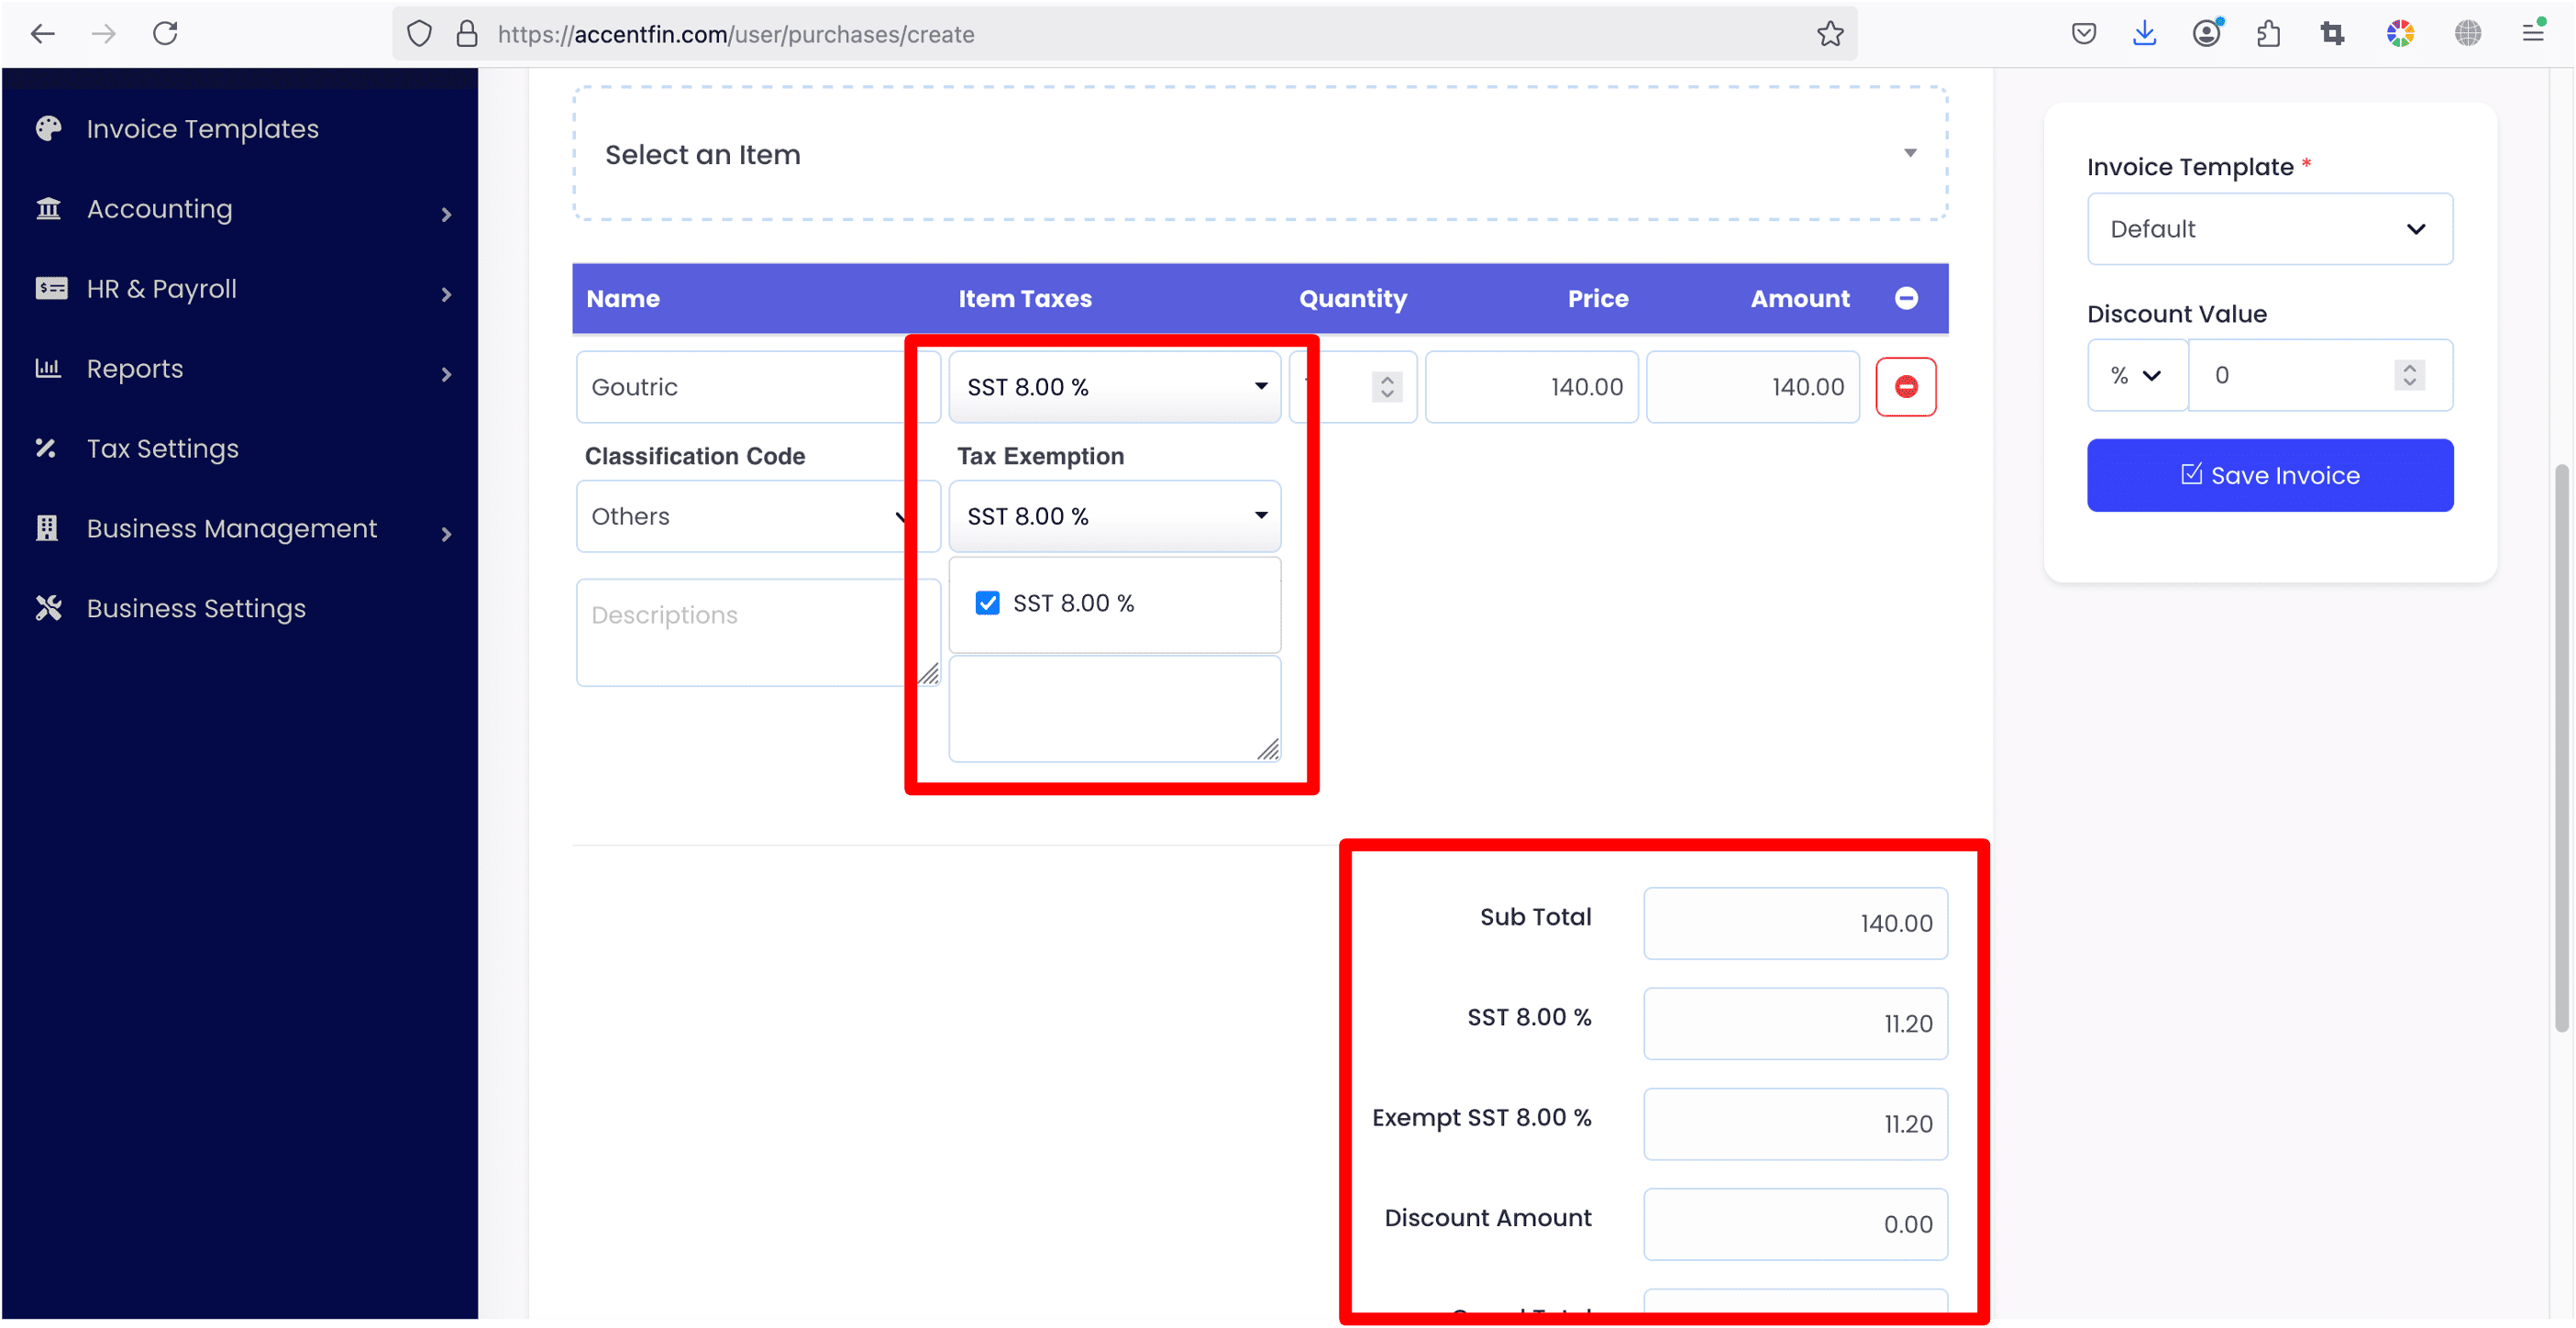
12. If there is one or more taxes selected to apply onto the purchase item, you will have the choice to exempt the selected tax by checking the checkbox. The changes in purchase totals will be reflected automatically.
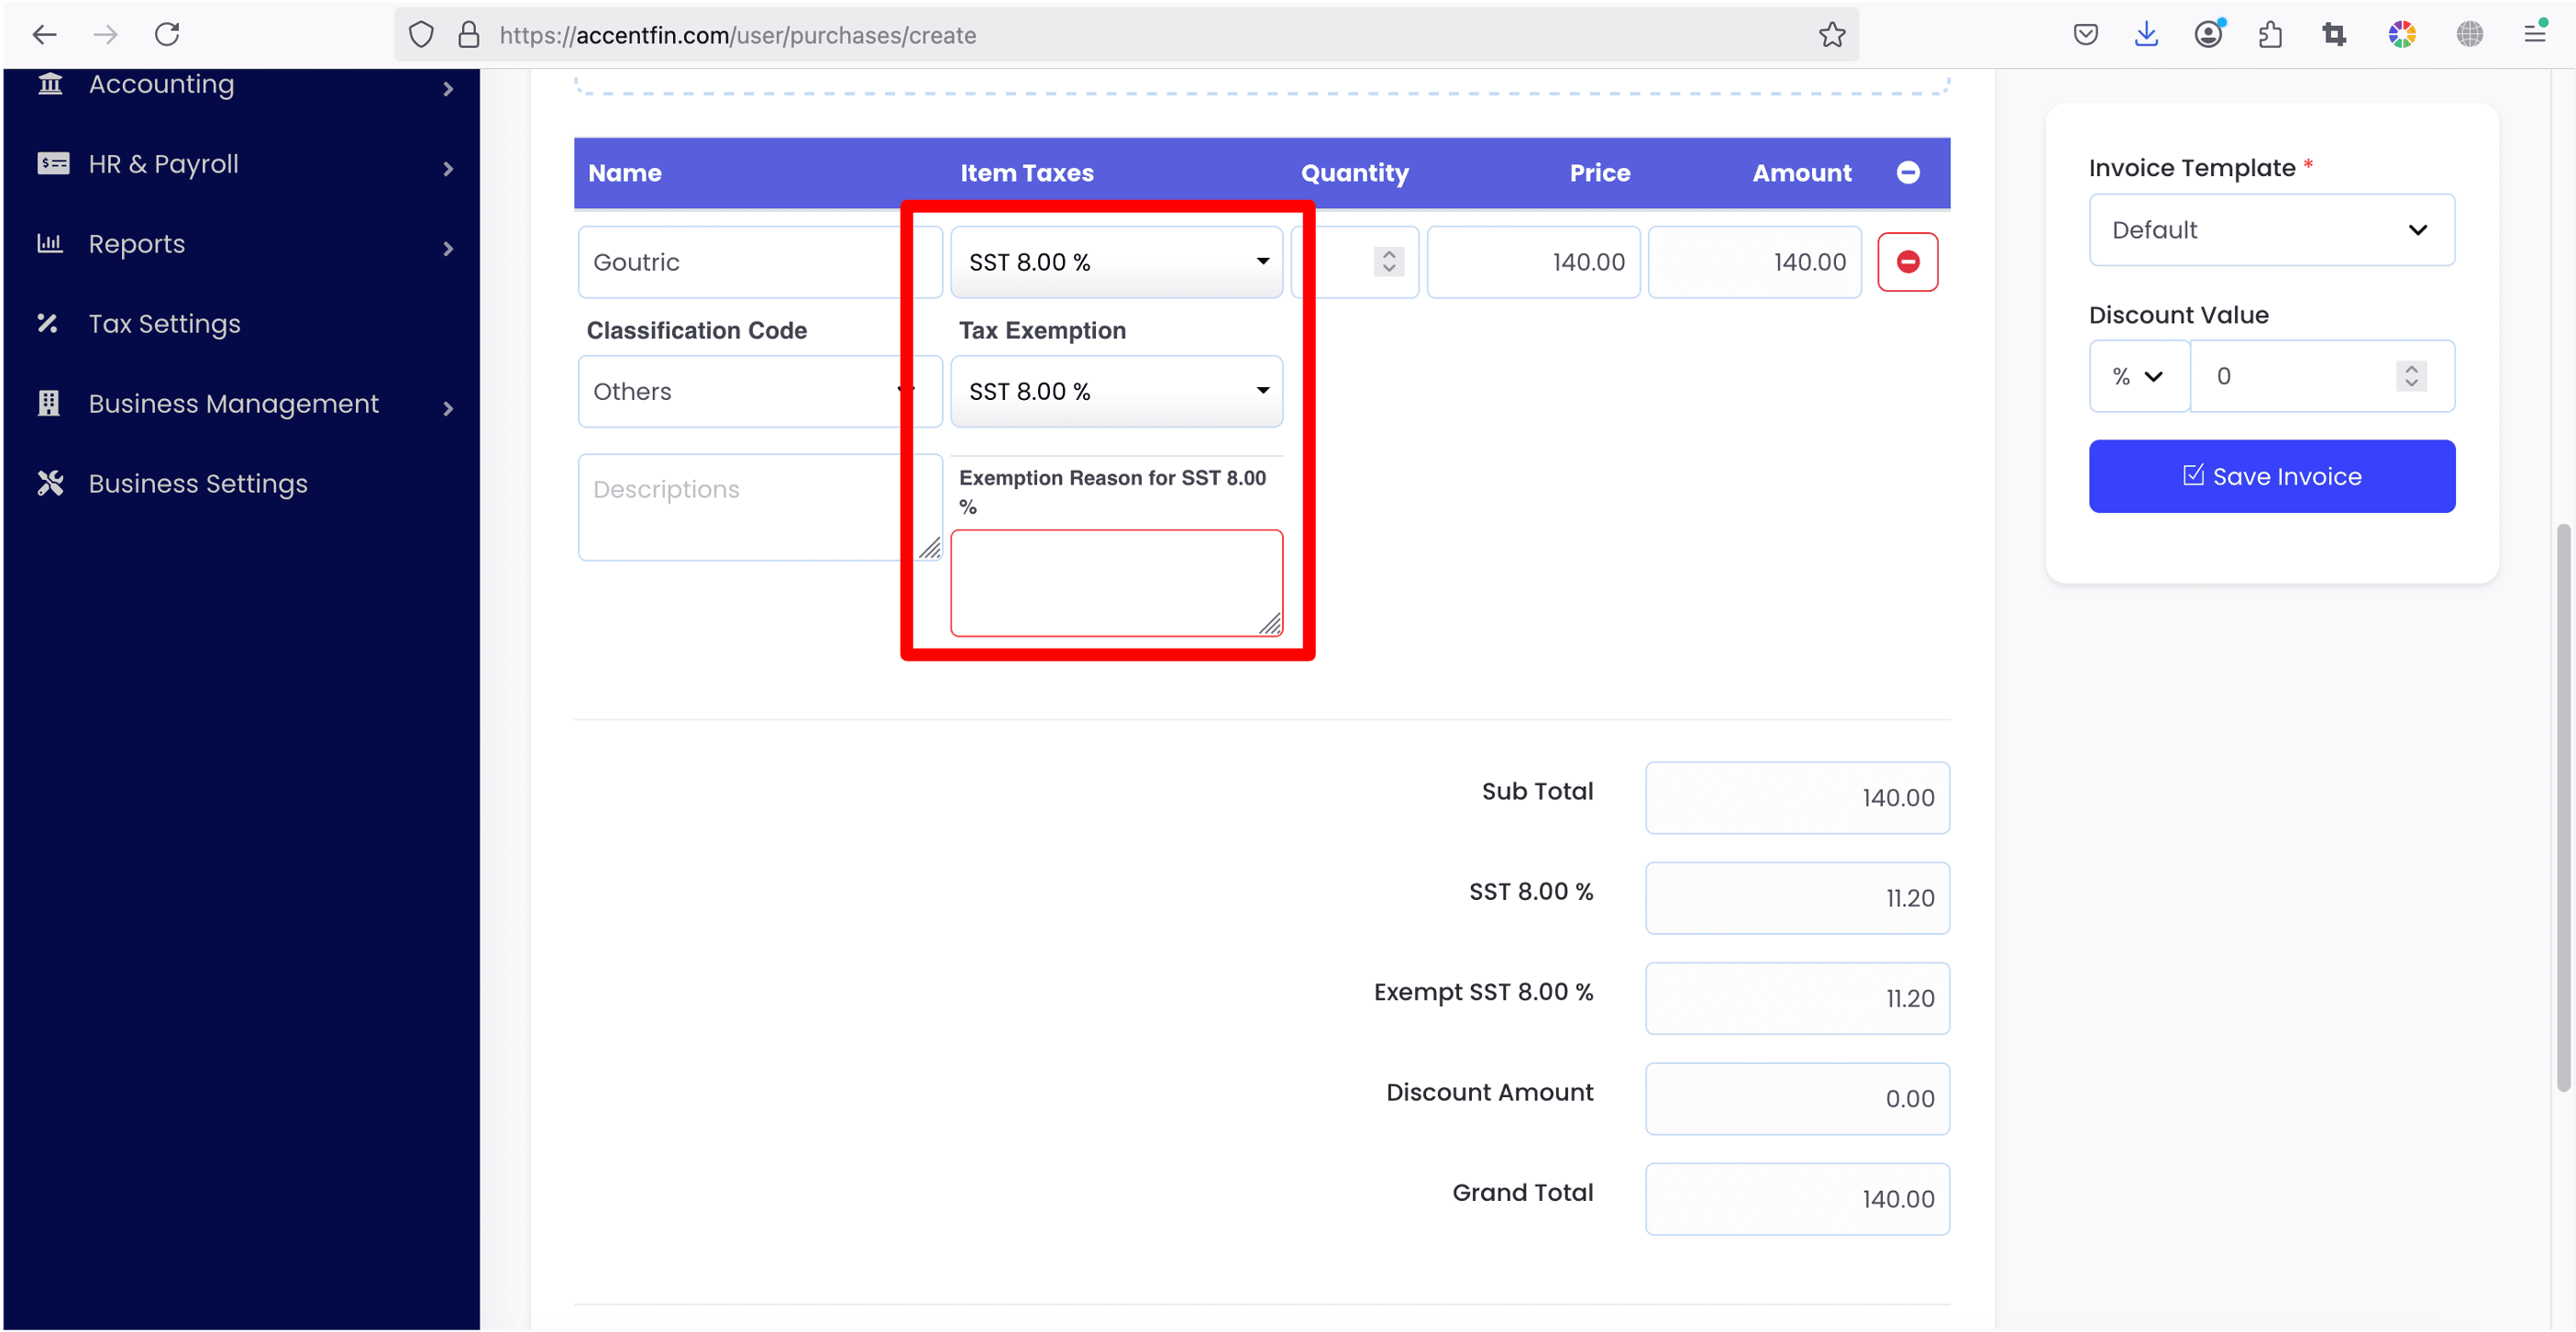
13. If you have chosen to exempt a tax, a textbox will appear under the tax exemption section and you are required to provide the tax exemption reason on why the tax could be exempted. (This is required by self-billed e-invoice)

14. Lastly, select the correct Invoice Template and click Save Invoice to save all changes. Refer to this tutorial for more information on what is Invoice Template.
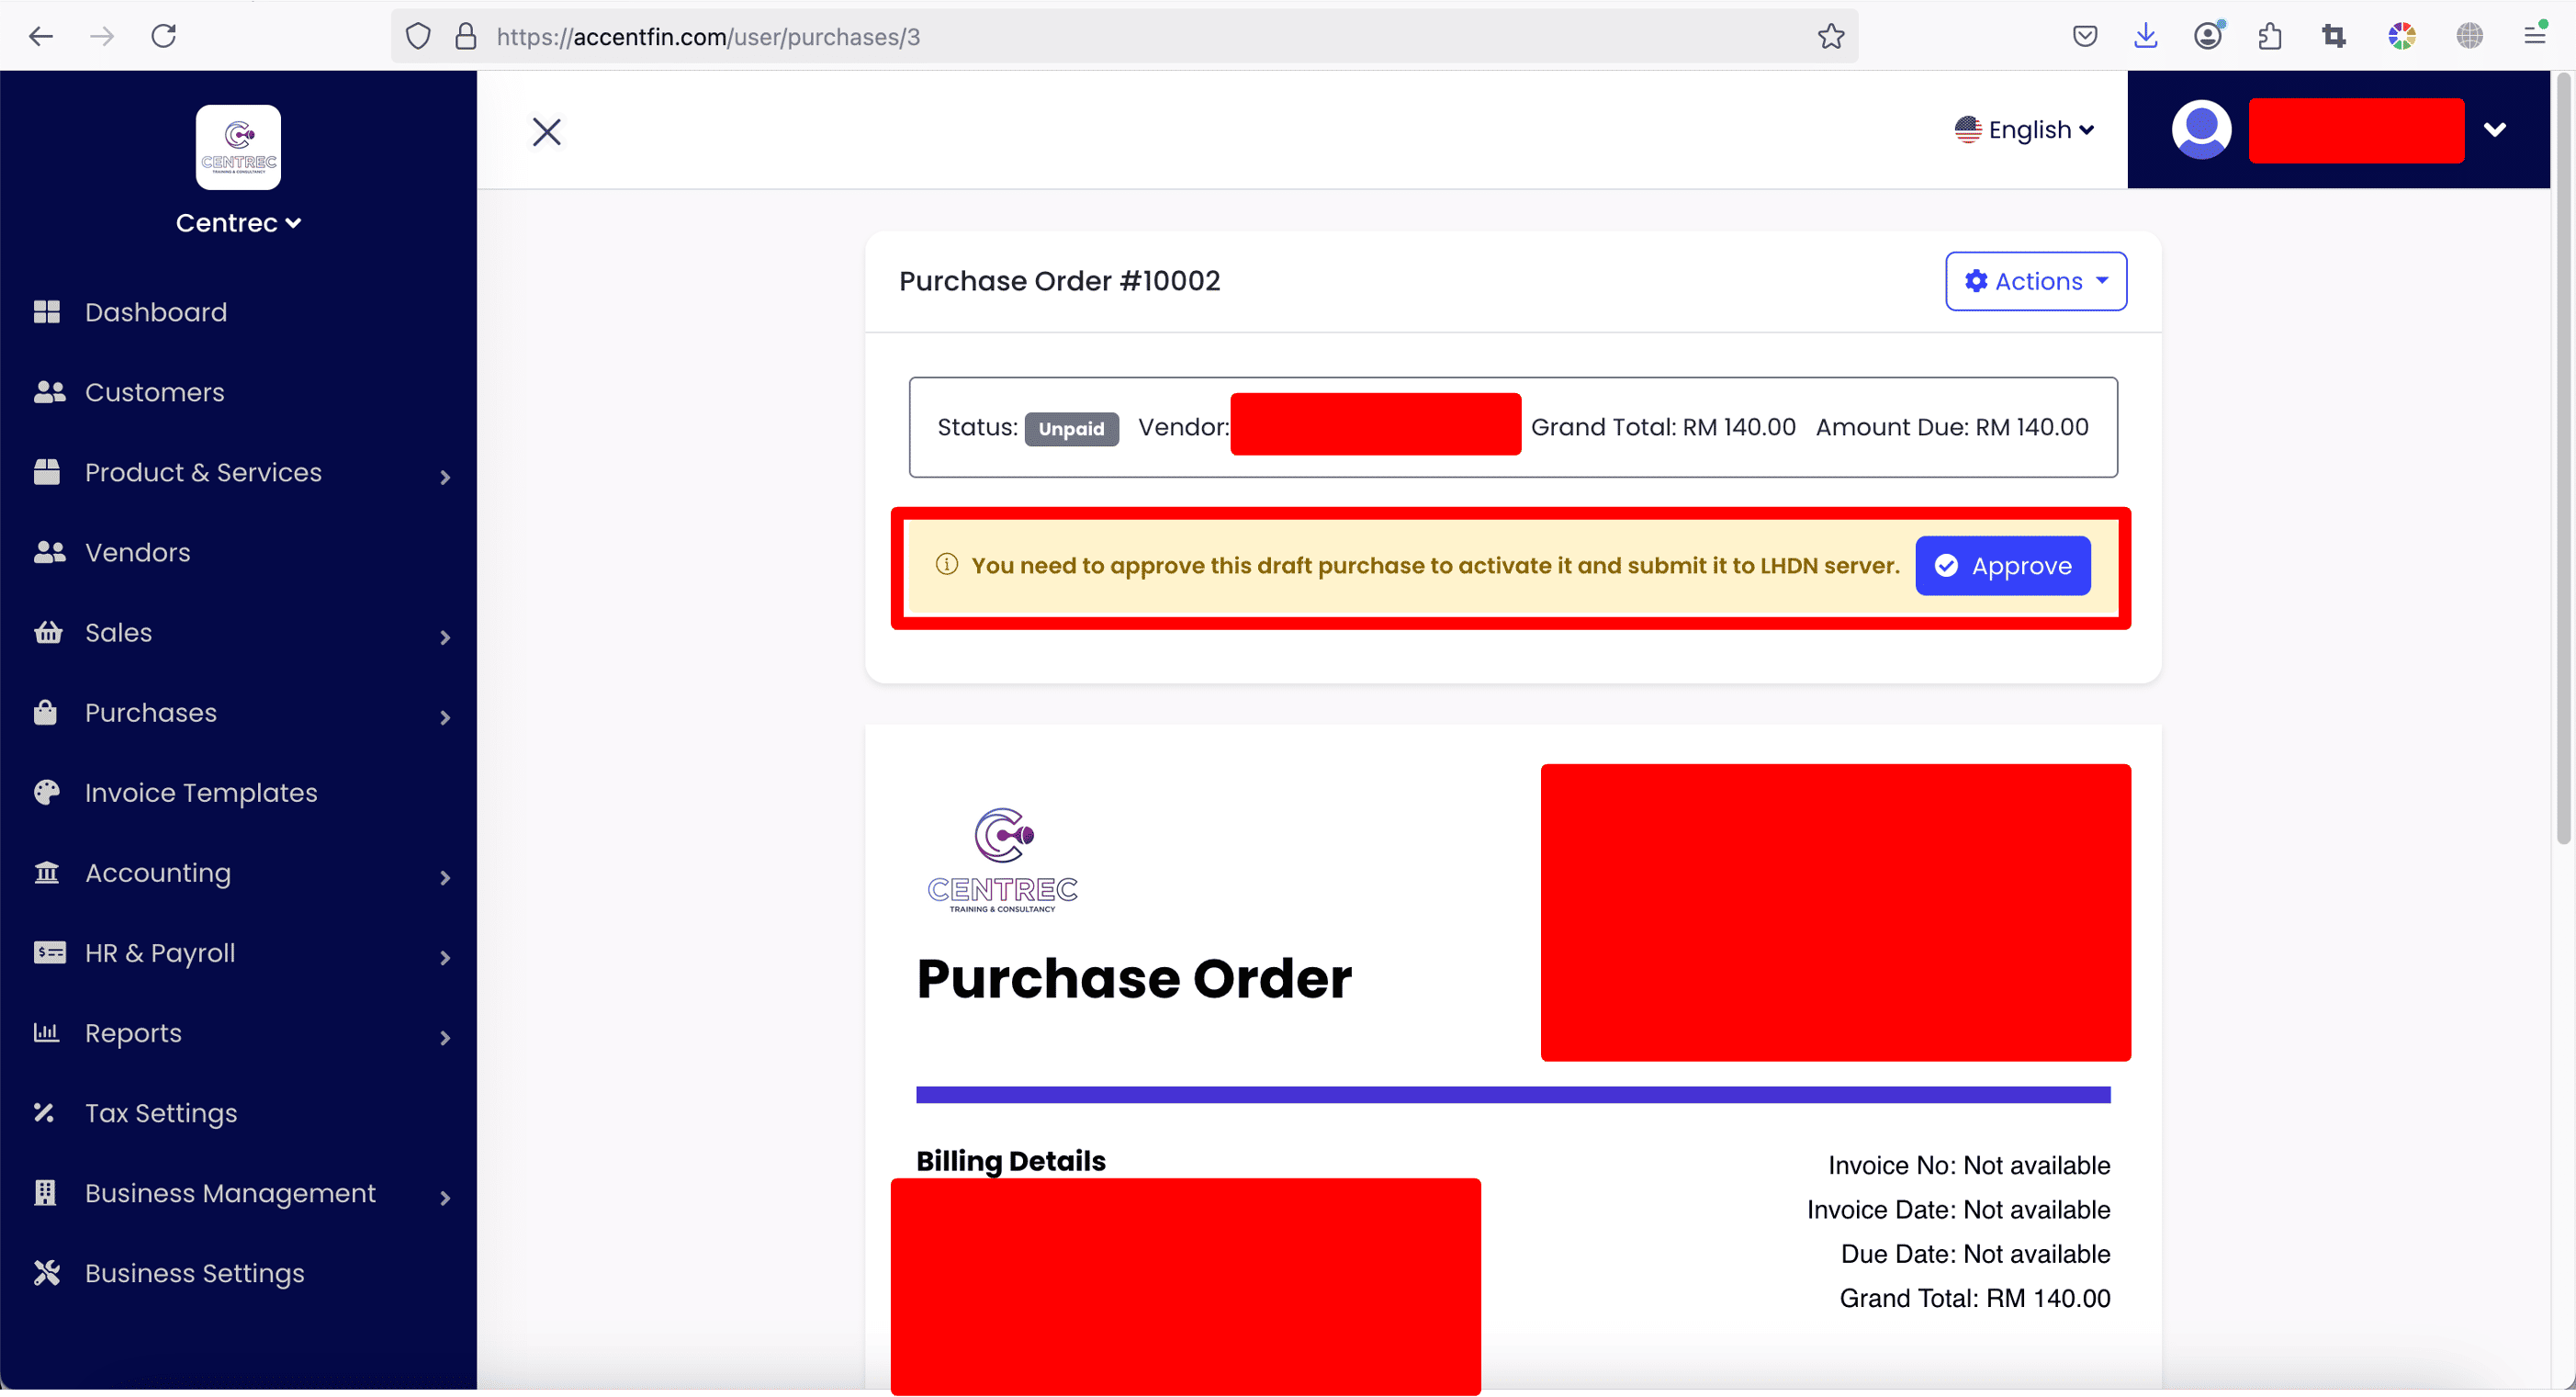
15. After you saved your purchase, you will be redirected to the Purchase Preview Page. If your purchase is newly created, it is by default Not Approved. You can click on Approve to activate the purchase and it will be submitted to MyInvois Portal as a new self-billed e-invoice. Note that submission to MyInvois Portal only works if you have enabled E-invoice function of your business (Refer tutorial for more information on how to enable E-invoice function).
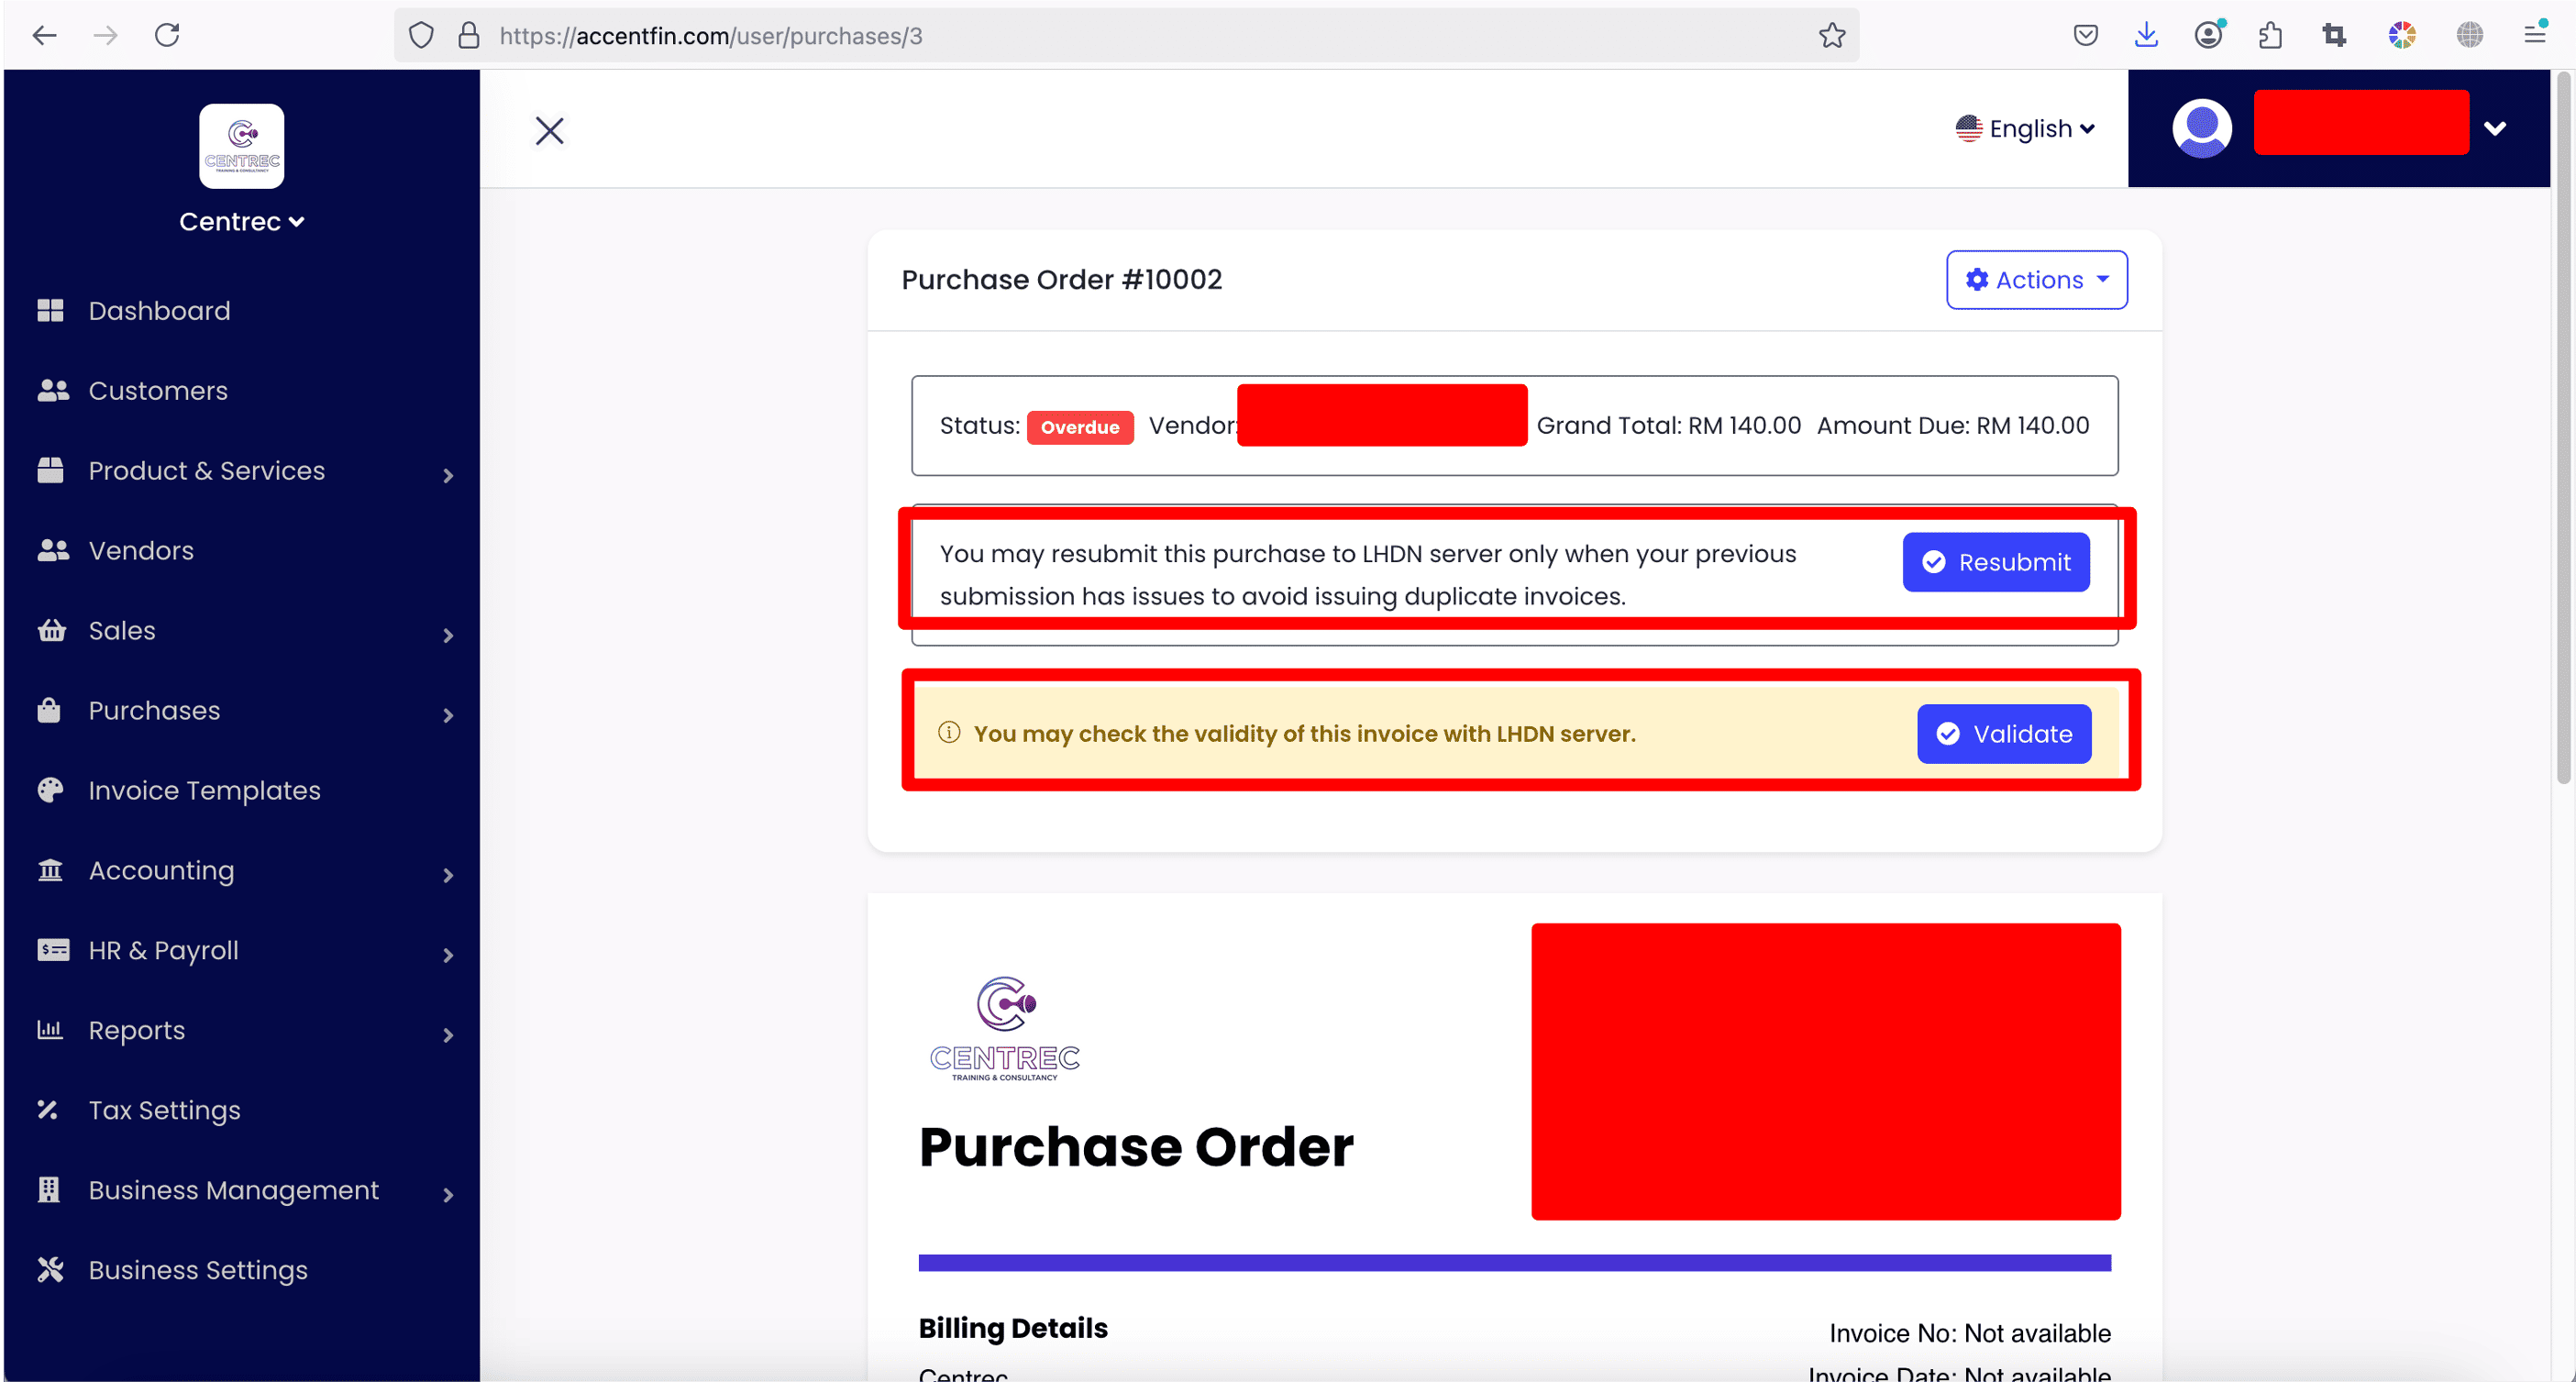
16. After your purchase is approved and submitted to MyInvois Portal, the Purchase Preview Page will be refreshed with two new options: Resubmit and Validate.
Resubmit should only be clicked if you are very sure that your issued self-billed e-invoice has certain errors and you need to resubmit the self-billed e-invoice record to MyInvois Portal.
Validate button can be clicked if you wish to validate the self-billed e-invoice record with MyInvois Portal to ensure that your self-billed e-invoice is valid and accepted by MyInvois Portal. You can always re-validate the self-billed e-invoice anytime.

Comments (0)