
NOTE
You are required to have a Salesplay POS account to proceed. No worries, you can get a Salesplay POS account for FREE, just proceed to Salesplay website and register an account (link).
This function is currently a Beta feature.
Step by step tutorial to integrate with Salesplay POS
1. After you registered a Salesplay POS account, proceed to the Salesplay Back Office (link).

2. At the side bar, proceed to Access token (as shown in the screenshot below)
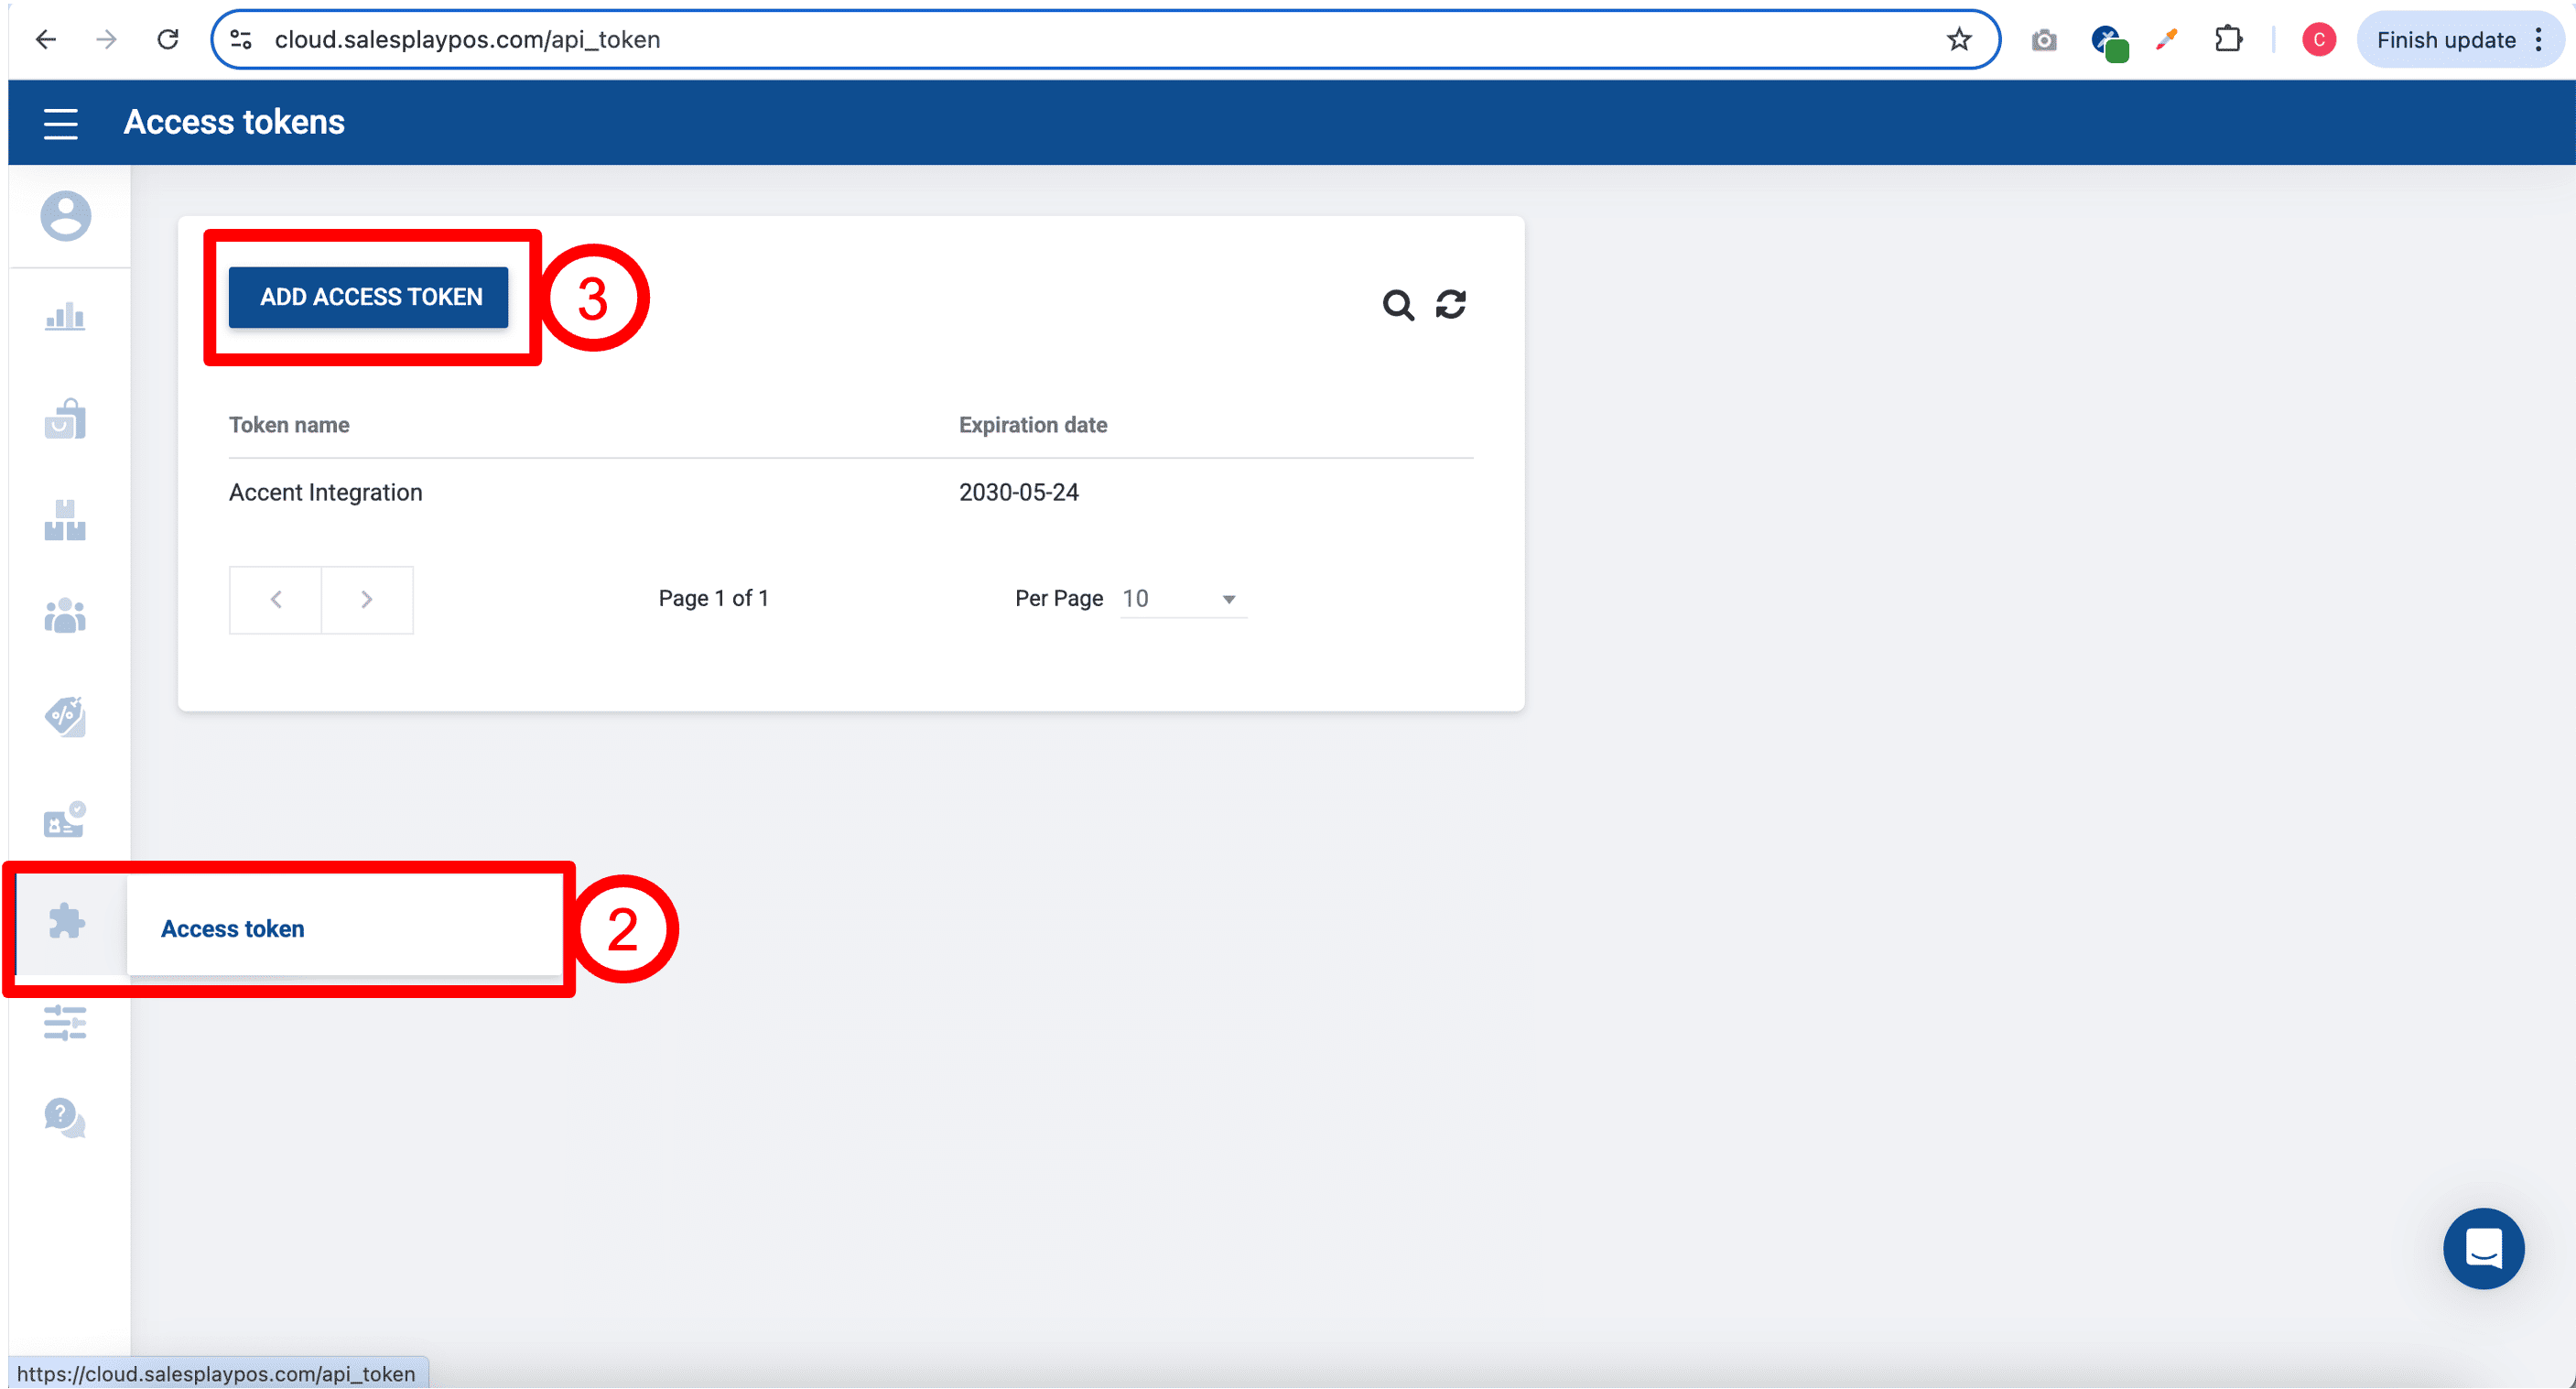
3. Click on ADD ACCESS TOKEN.
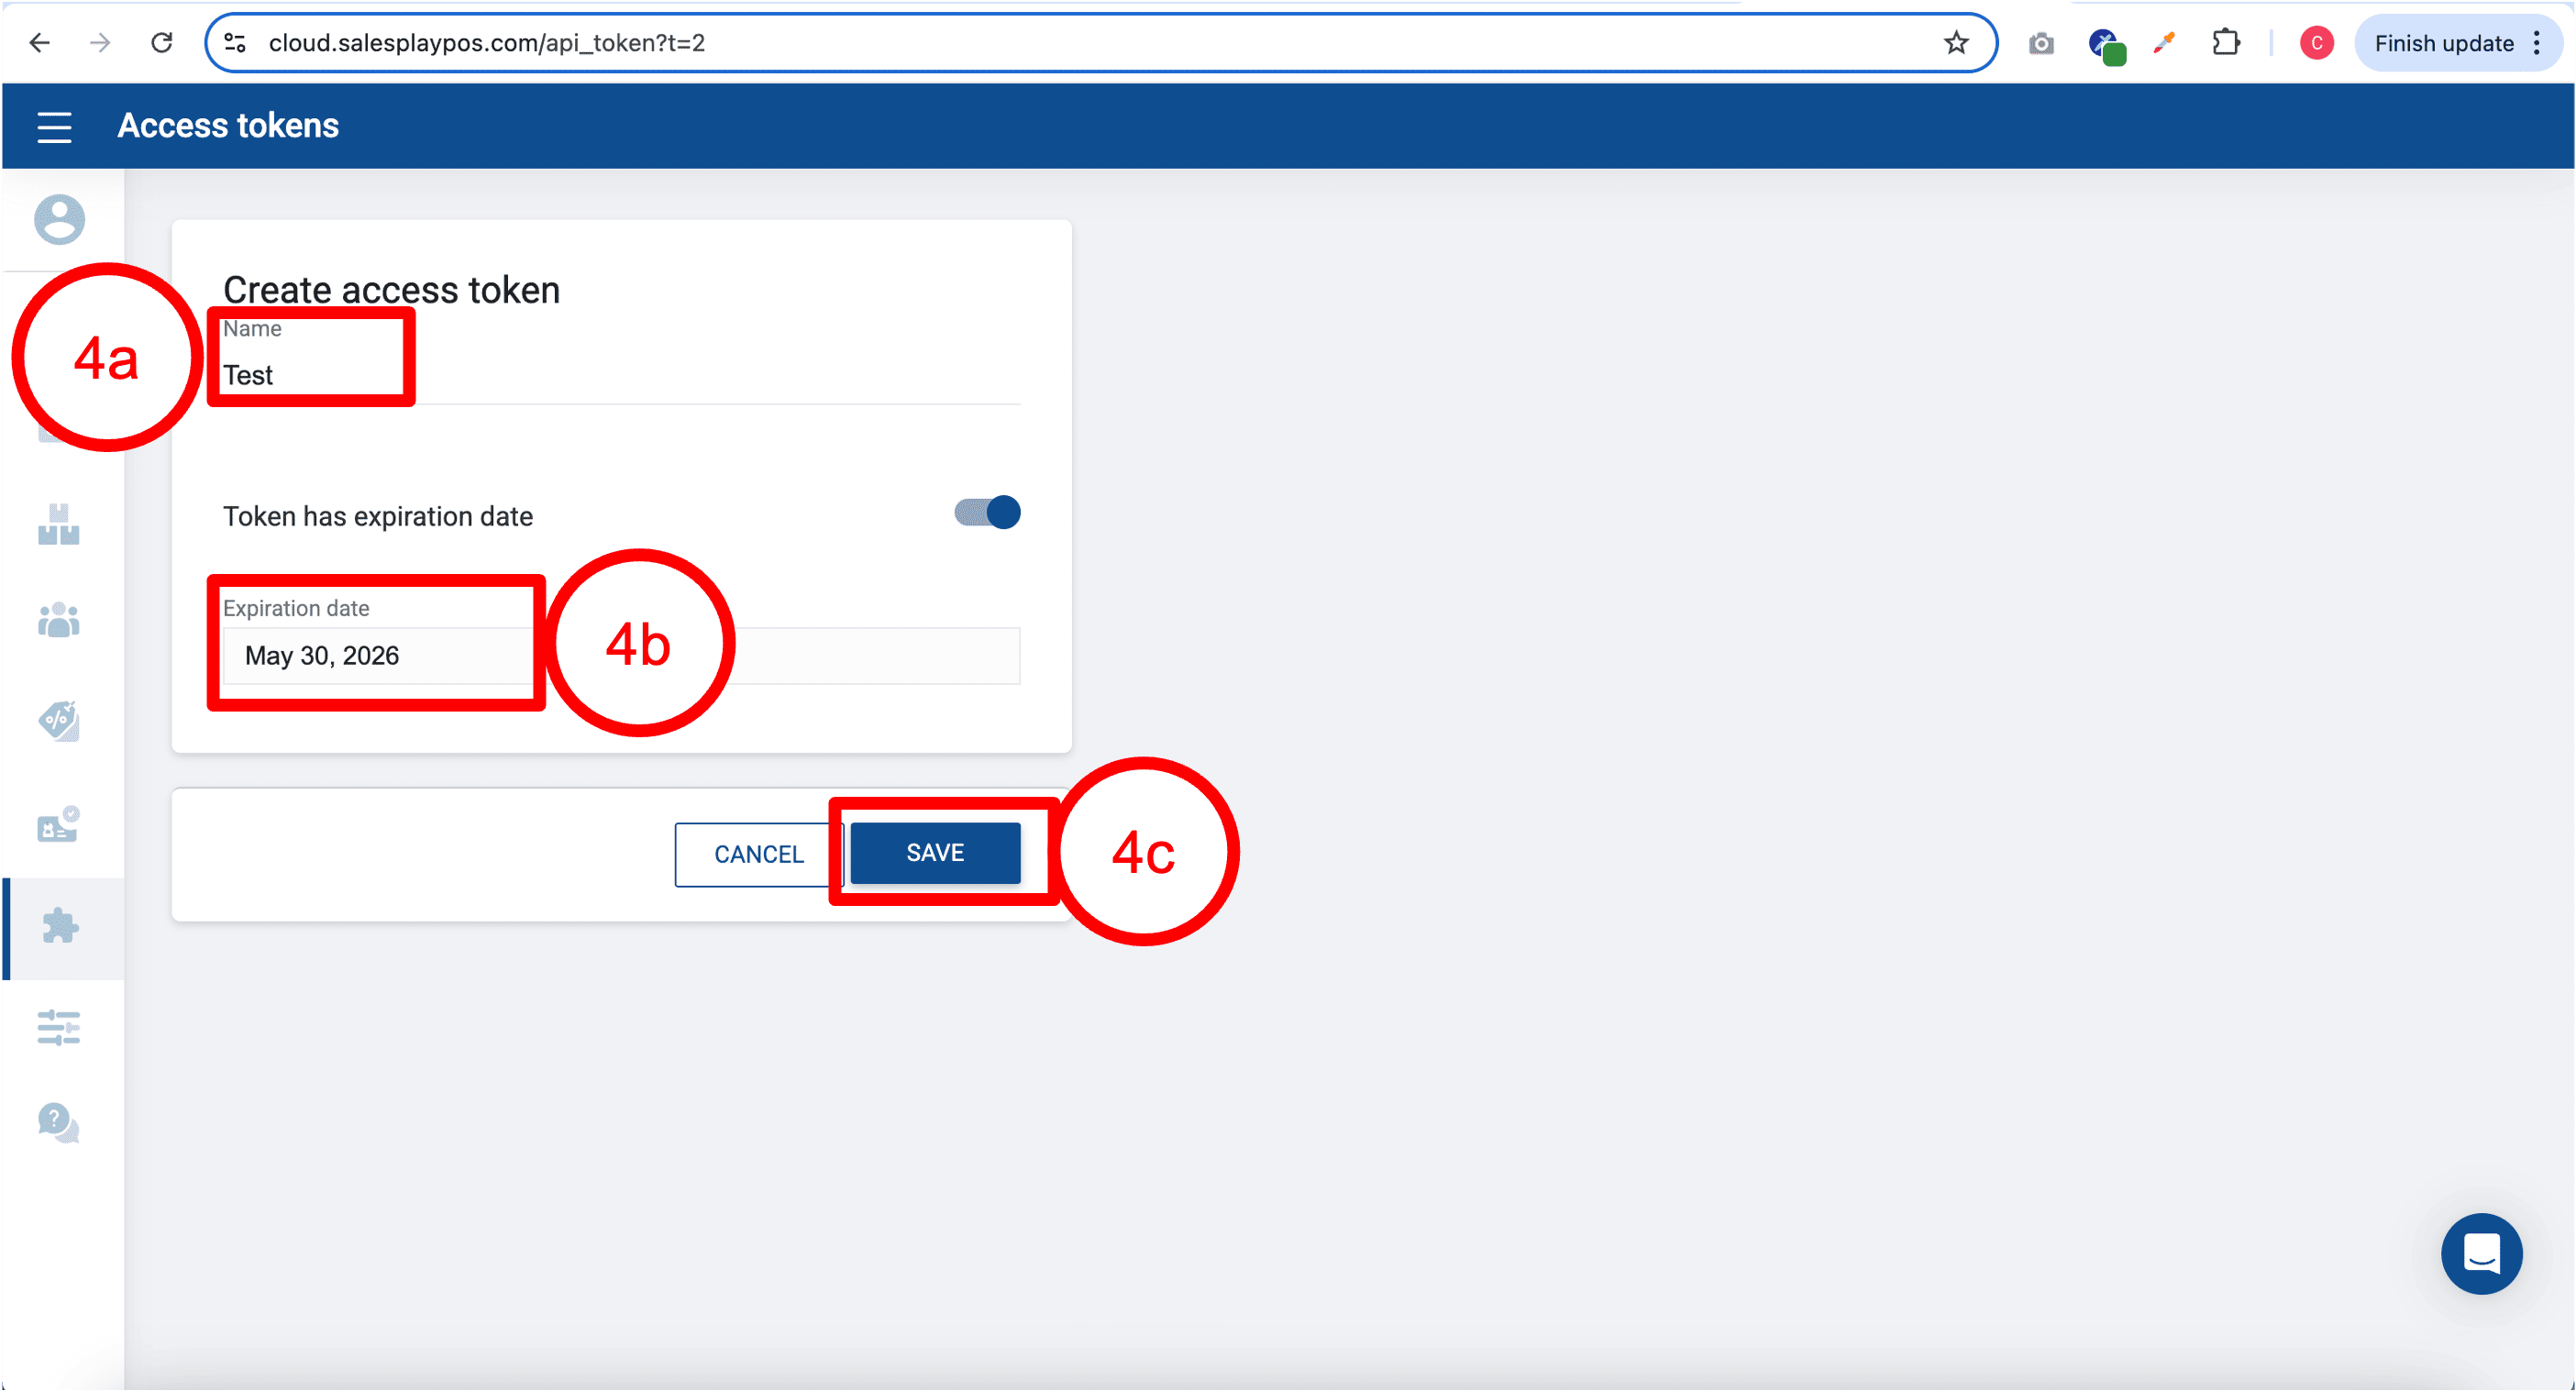
4. Give your access token a Name and set an expiry date for your token, then click SAVE.
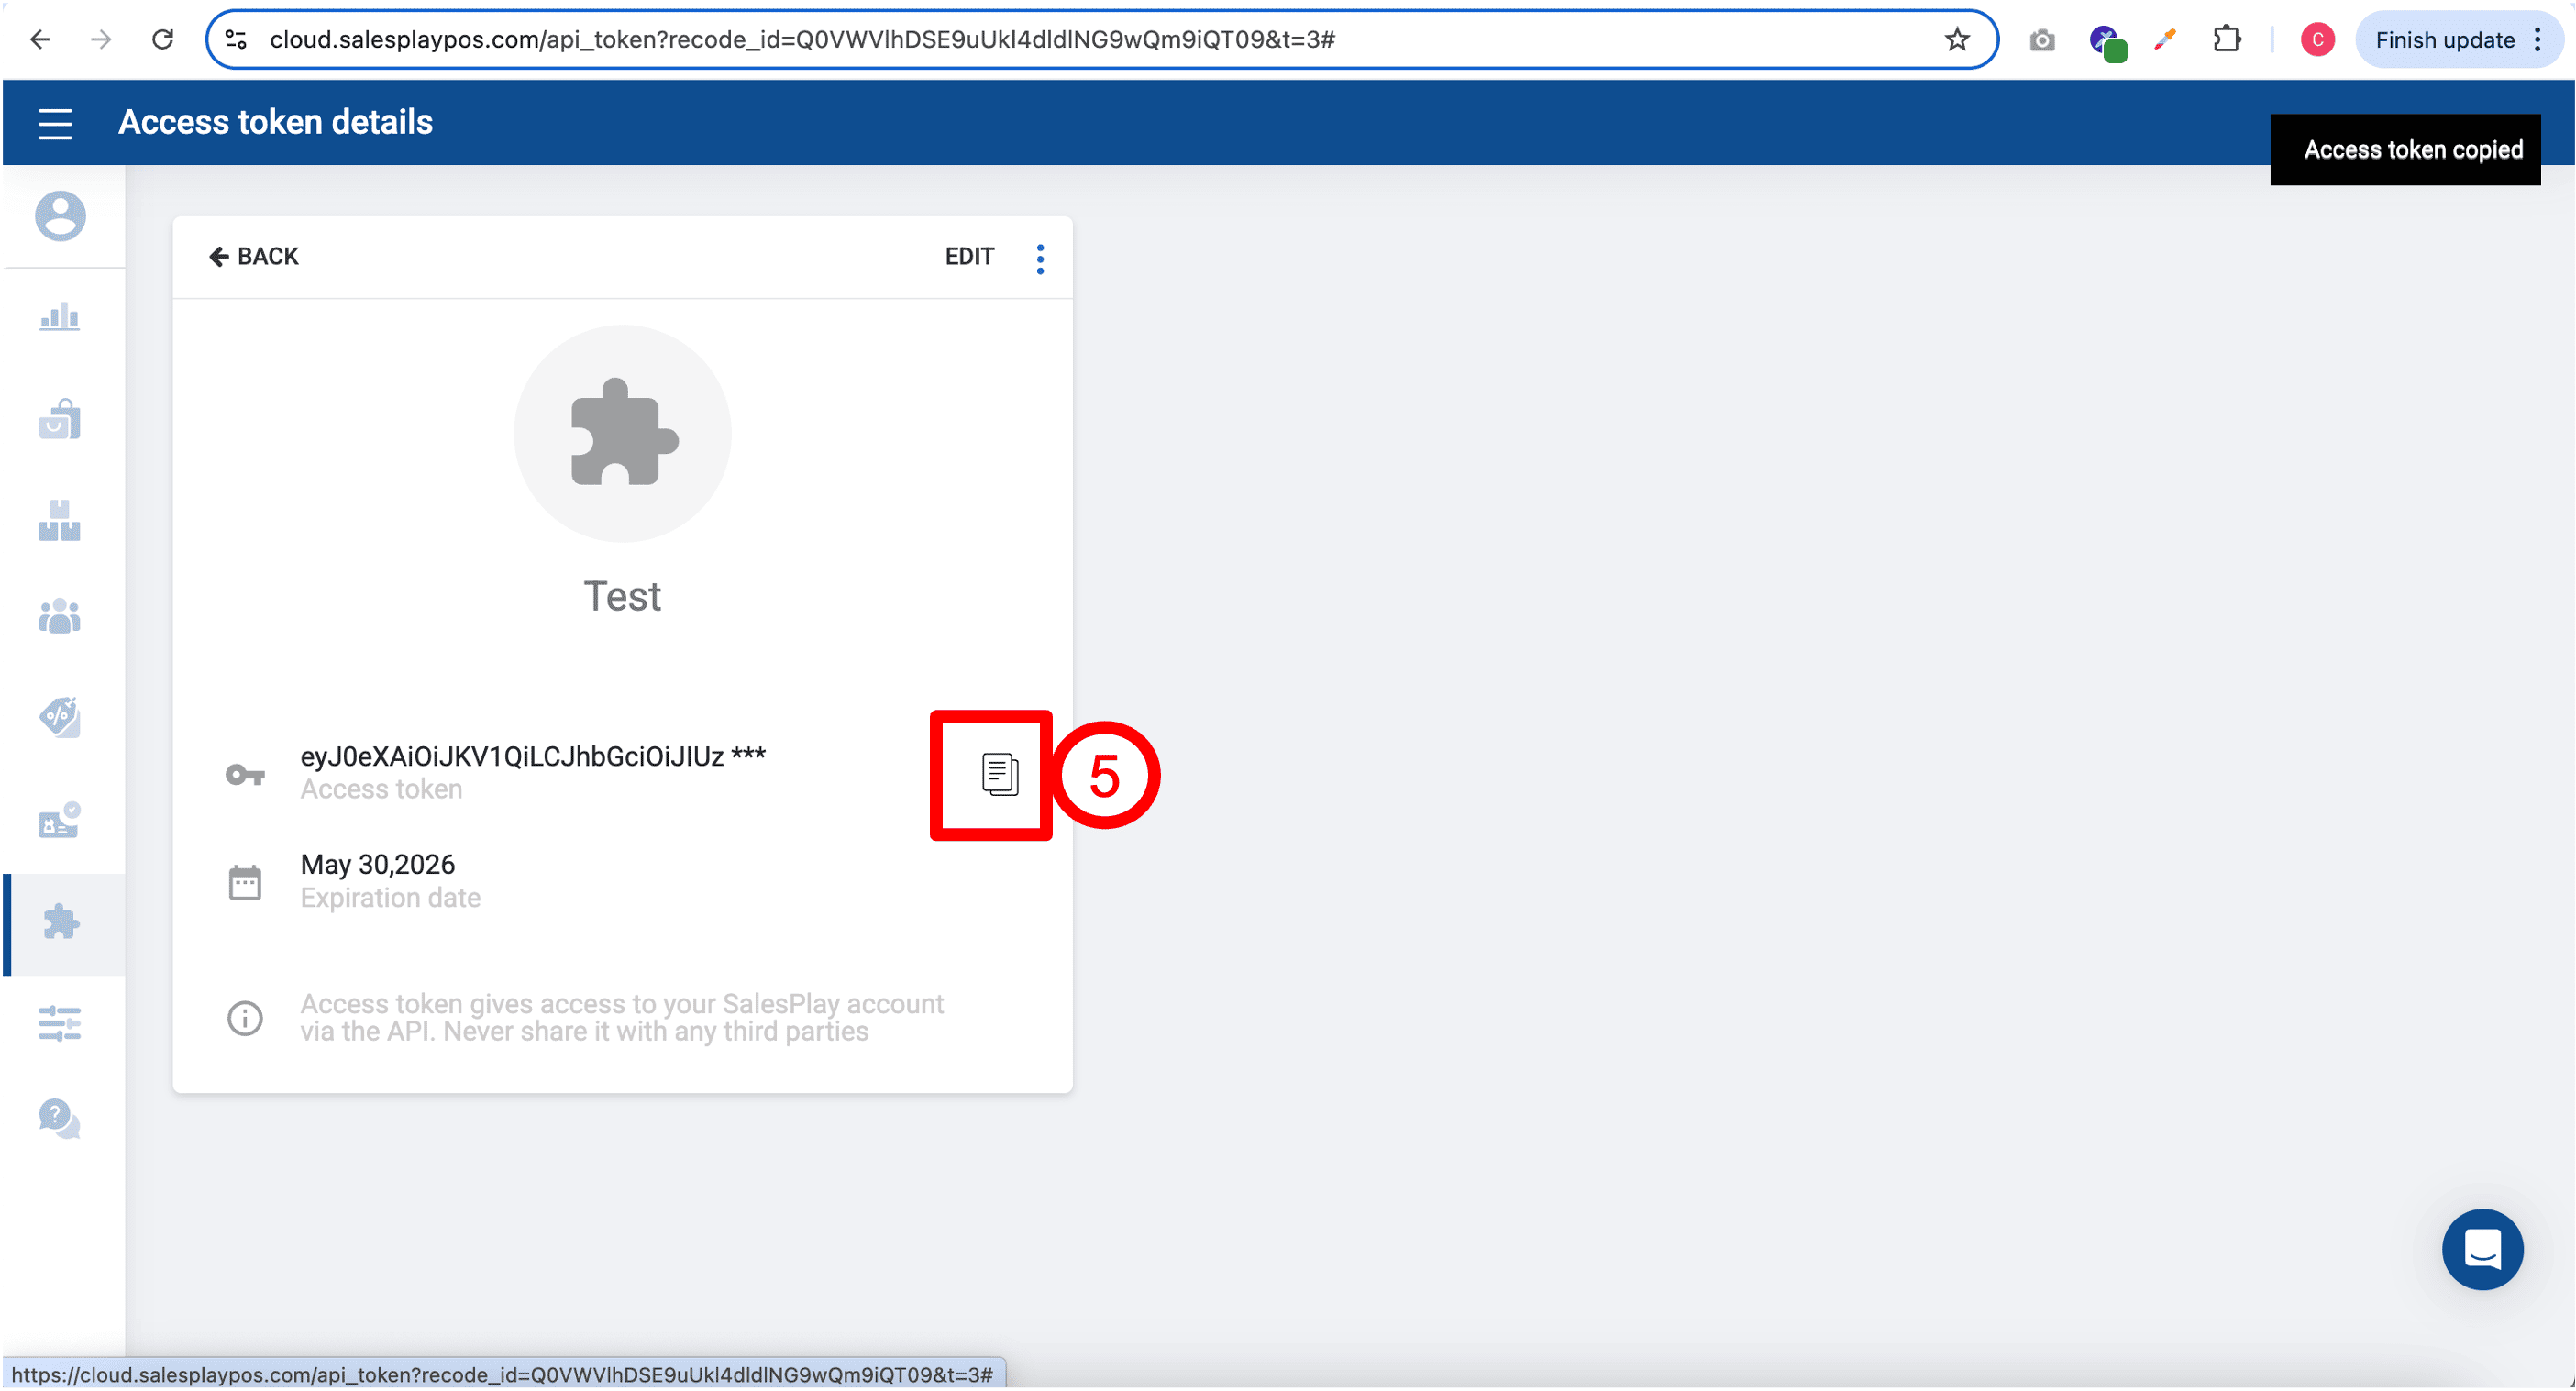
5. Click on the Copy icon to copy your newly created access token.
6. Proceed to Accent (https://accentfin.com/), sign in to your Accent account, at the side menu bar, proceed to Business Settings.

7. Then, at the top bar, click on Integrations.
8. Expand the accordion by clicking on Salesplay POS.
9. Fill in the access token that you have copied earlier.
10. Click Save Settings. DONE! You have successfully connected your Accent account with your Salesplay POS account.
Next, we will guide you on how to import your receipts / orders data from your Salesplay POS account to Accent.
1. After saving your access token, click on Proceed button (located beside Data Lookup wording).

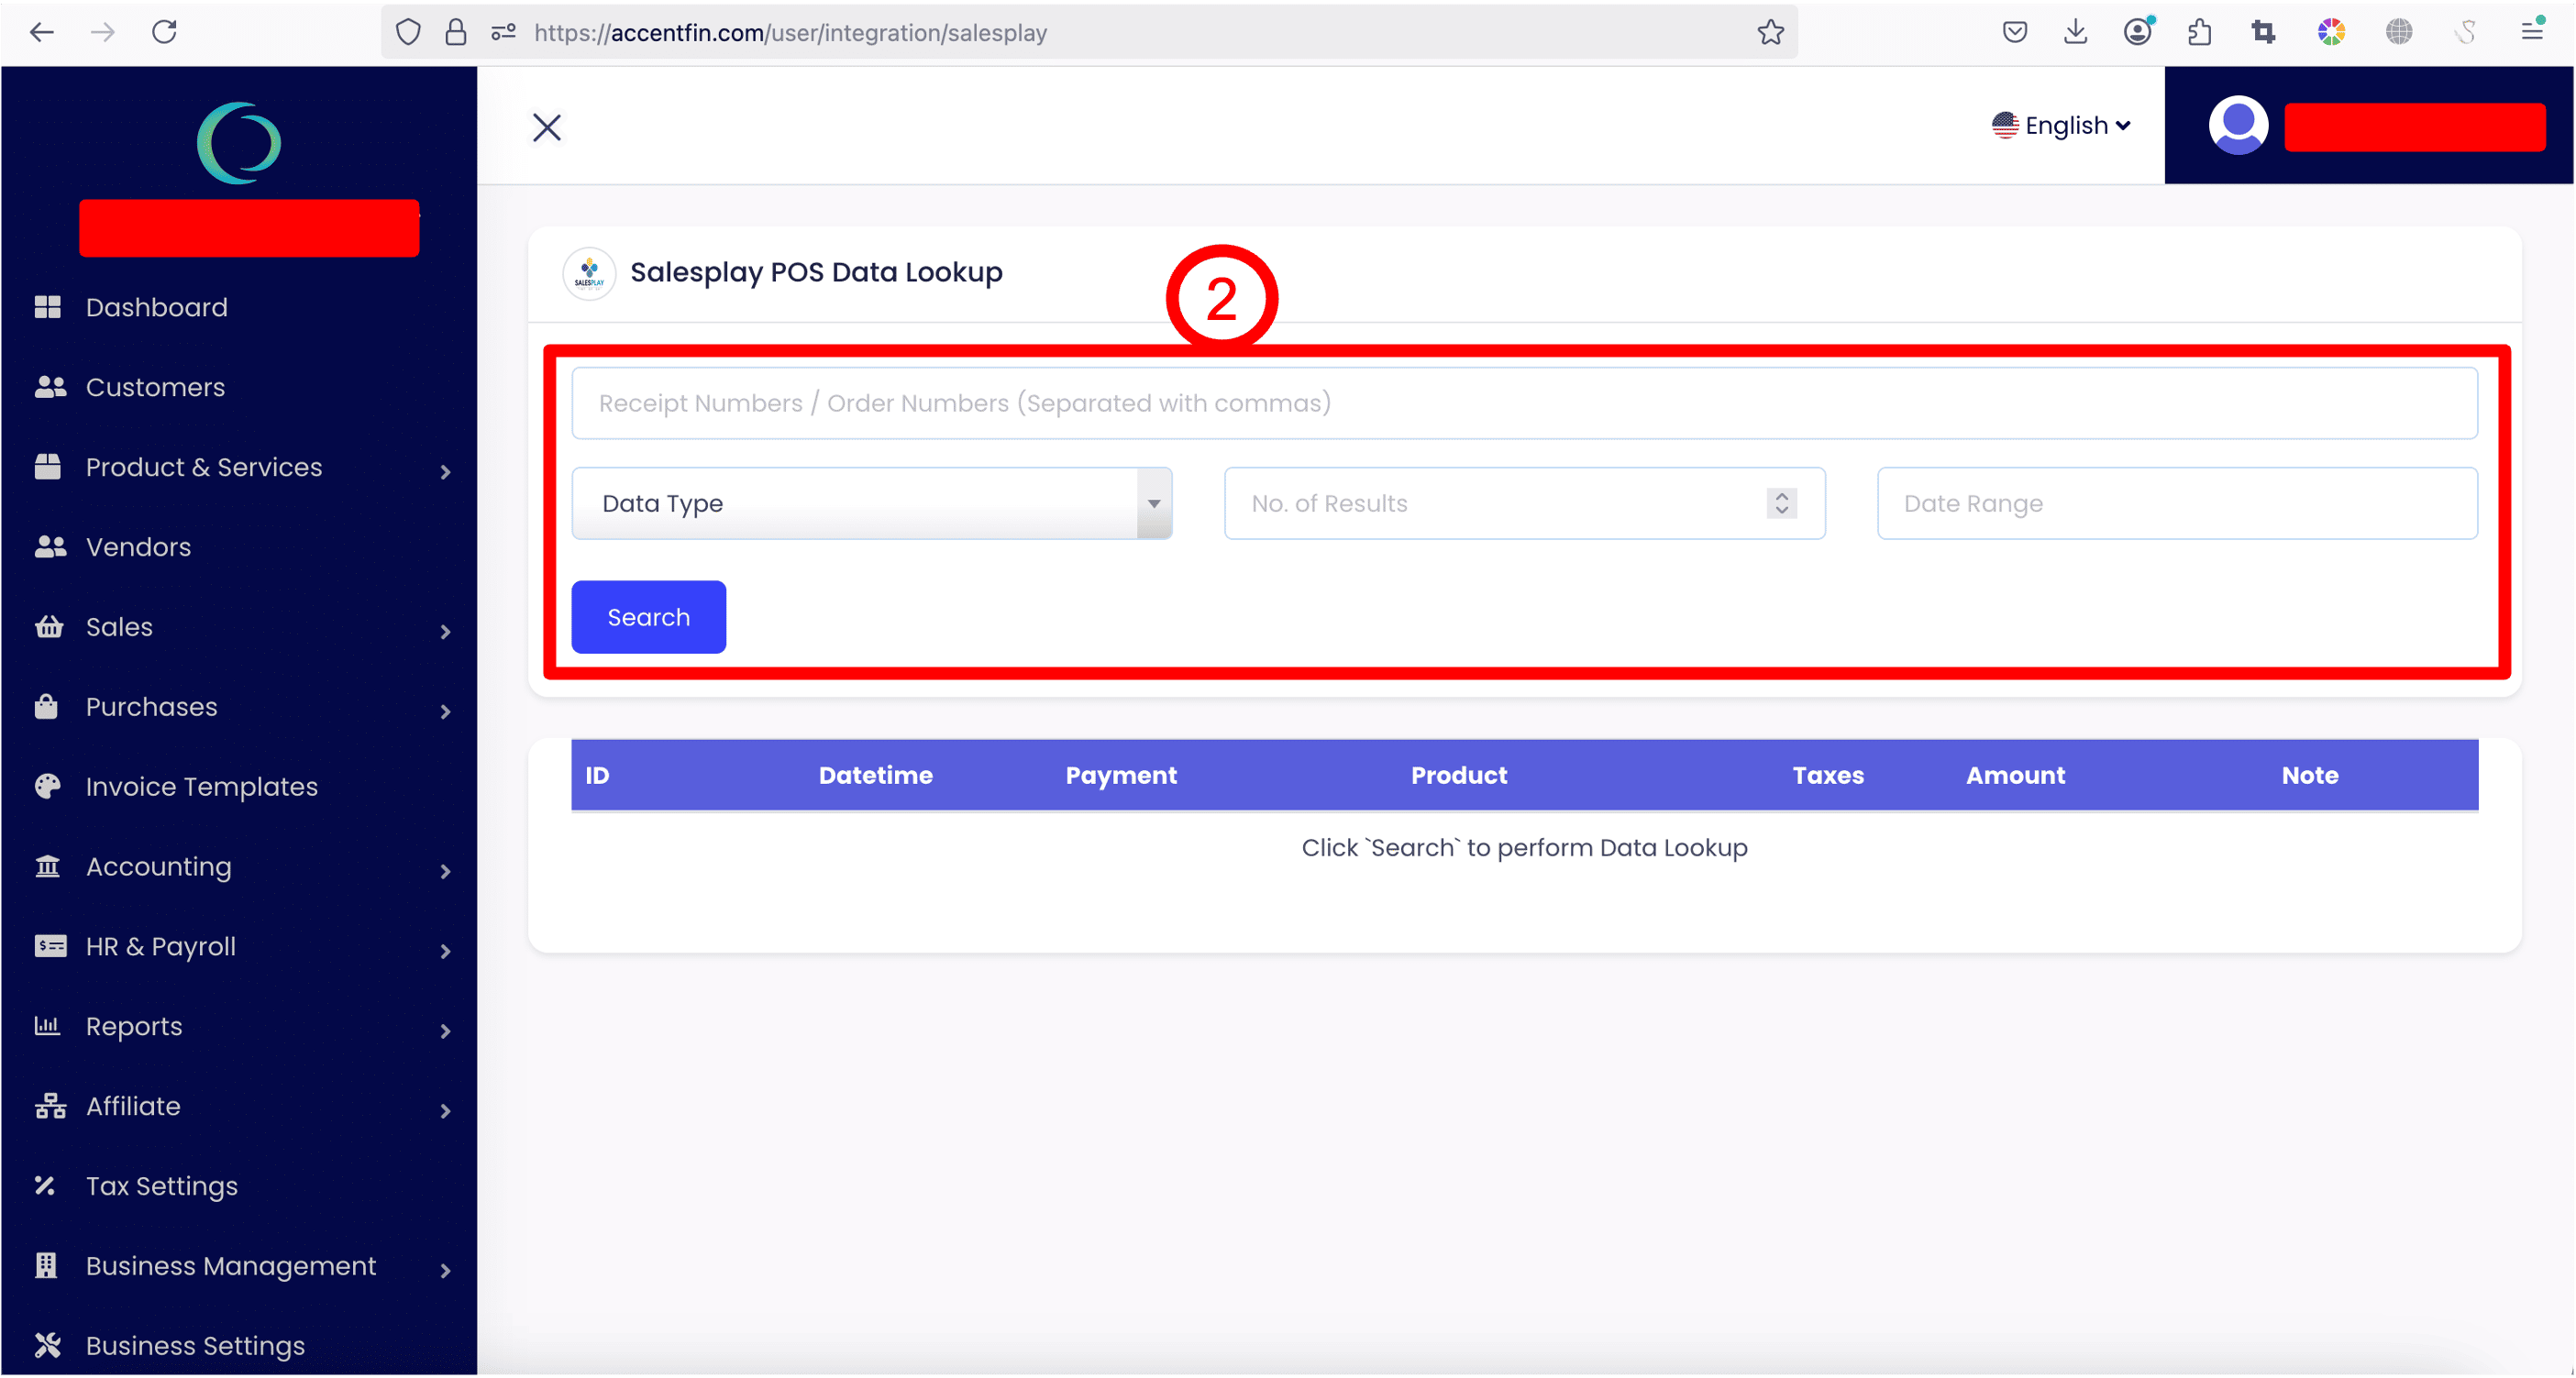
2. After reaching the following page, you can fill in the form accordingly and click Search to retrieve your receipts / orders data from your Salesplay POS account.
- Receipt Numbers / Order Numbers (Separated with commas)
This field is optional, you can fill in specific receipt numbers or order numbers to search for specific receipts or orders data from your Salesplay POS account. For example, 1-2505242,1-2505241. You may also leave it empty if you do not have any specific receipts or orders data to look for.
- Data Type
This value is mandatory, you may select Receipts if you wish to retrieve receipts data, vice versa, you may select Orders if you wish to retrieve orders data from your Salesplay POS account.
- No. of Results
This is to limit the maximum number of results being returned from Salesplay POS, if you did not fill in any number, the default value is 10.
- Date Range
This value is mandatory, you are required to select the starting date and time and ending date and time of the data you wish to retrieve from Salesplay POS.
3. If no data is being returned from Salesplay POS, the results will show "No record found!".

4. Vice versa, you will see a list of receipts / orders data listed in the table below.

5. As some of the data is mandatory in Accent but absent in Salesplay POS, you are required to provide the values for the mandatory data, such as Account, Income Category, Classification Code. (Note that this only applies if you wish to convert and import your receipts or orders data from Salesplay POS into your Accent account).

6. To save your time, you can choose to apply default values for these mandatory data (Account, Income Category, Classification Code) to ALL of your receipts or orders data in one shot. Just simply select the value you want from the dropdowns and click on Apply Default Values, all of your retrieved receipts or orders data will be updated immediately, simple!
7. On top of that, you can still freely adjust the mandatory data values based on your needs for individual receipt or order data row. Just click on the respective dropdown and change to whatever value you want to update.
8. Now, let's look at the grayed out fields. These field values are directly retrieved from your Salesplay POS account, for your conveniency, you can edit the values inside the grayed out fields, but it is not recommended to do so because it might cause data inconsistencies between the two platforms (Accent and Salesplay POS).

9. There are 4 types of grayed out fields: Payment Method, Product Name, Taxes and Amount, each are controlled by separate buttons (as shown in the screenshot).
- If you wish to edit Payment Method, click on Allow Edit Payment Method, a popup model will show on your screen to ask for your confirmation, click Yes to proceed and the grayed out fields for Payment Method will turn to normal fields and you can edit them accordingly.
- For Product Name, click on Allow Edit Product Name, a similar popup model will appear to ask for your confirmation, click Yes to proceed and the grayed out fields for Product Name will turn to normal fields and you can edit them accordingly.
- Same to Taxes, click on Allow Edit Taxes and click Yes to proceed if you wish to adjust the taxes for the receipts or orders data.
- Lastly, similar to Amount, click on Allow Edit Amount and click Yes to proceed if you wish to adjust the total amount of the receipts or orders data.
SPECIAL NOTE FOR TAXES
For each receipt or order record, you can apply one or more taxes onto it, you may click on the "+" icon to add new tax or "-" icon to remove a tax from the receipt or order record.
For each taxes being applied to the receipt or order record, you can choose to exempt the tax by checking the checkbox for "Exempted?" and once the checkbox is checked, you must provide a valid reason to explain why the tax could be exempted (this is required by LHDN).

10. After performing necessary edits to the grayed out fields, you can turn them off by clicking on Disallow Edit Payment Method, Disallow Edit Product Name, Disallow Edit Taxes and Disallow Edit Amount. Once clicked, the fields will turn back to gray color and you will not be able to edit them until you turn them on again.

11. Lastly, to convert the receipts or orders data and import them into Accent, you may click on the red button: Convert to Transactions.
12. A popup model will show on your screen asking for your confirmation to proceed on the conversion. Click Yes to proceed or click Cancel to stop the process.

13. Any mistakes found in your receipts or orders data will force the conversion to pause and you can review the error message under the red button. Adjust your data accordingly to avoid errors, and click on Convert to Transactions to start the conversion process again.

14. If any of the receipts or orders data has been converted previously or already existing in Accent system (identified by the ID number), there will be a popup model showing on your screen, this is to ask for your confirmation.
- You can choose to skip these existing data, so that these data will not be converted or imported again into Accent system, this can prevent duplicate data.
- Or (not recommended), you can choose to keep copy, if this is being selected, the duplicated data will be converted and import into the Accent system again, which this might cause duplicate data, therefore, be careful on which step you choose.
- Or you can click on cancel to stop the whole process.


15. DONE! You may proceed to Accounting > Transactions (located at side menu bar) to check for your newly converted and imported data from Salesplay POS.

NOTE
To learn more on converting the transactions to e-Invoice / consolidated e-Invoice, or to issue individual e-Invoice to customer, or to allow your customer to request for e-Invoice on their own without you manually issuing one by one, please refer to the tutorials listed below.
![]() https://accentfin.com/blogs/know-more-about-transaction-records
https://accentfin.com/blogs/know-more-about-transaction-records
![]() https://accentfin.com/blogs/how-to-enable-e-invoice-requesting-form-
https://accentfin.com/blogs/how-to-enable-e-invoice-requesting-form-
Comments (0)